Posts tonen met het label Fusion. Alle posts tonen

dinsdag 6 december 2016

eBS Customization and Conversion versus Cloud Customization and Conversion

In a traditional Oracle e-Business Suite environment customization logic (forms, triggers, procedures etc) are directly coded in the Oracle e-Business Suite environment. Because of this the logic is directly integrated and all objects are immediately accessible.
Conversion and integration usually takes places via open interfaces (there are more possibilities of course like API's, database links, webservices, integrated SOA Gateway, etc). But usually we use a traditional conversion file, which is first loaded in a custom staging table where we do enrichment, validation and transformation before sending the information to the open interface.


How is this changed in a cloud environment?

In a cloud environment these open interfaces are still there. They are unlocked using UCM, the Universal Content Manager. Using standard import processing, which were available in Oracle eBS as well, the data from UCM is loaded into the open interfaces and imported in the Oracle tables.

The main difference with the traditional eBS environment is that all enrichment and transformation must have taken place before loading into UCM. You deliver the enriched and validated data for example through excel spreadsheets which can be loaded using File Based Data Import.
Excel sheet templates can be loaded from Oracle Enterprise Repository.
(For example templates for ERP Cloud can be found here http://docs.oracle.com/cloud/latest/financialscs_gs/OEFBF/FBDIOverview.htm#FBDIOverview)


Next to File Based Data Import the SAAS environment also provides several webservices which can be invoked directly from the external application. Usually this occurs using a middleware environment (like SOA Suite, Mulesoft etc), where enrichment and transformation takes place (and where also error handling with an error hospital is usually taken into account).
Note that File Based Data Import can also be invoked as a webservice. Using middleware you would do your enrichment and transformation and you send the excel files to UCM, which will load the open interfaces. You could even fetch some data from SAAS first to enrich the data using a webservice that invokes a BI Report to fetch the data.

In stead of developing customizations directly into the SAAS environment, customizations can be developed in a separate environment. This can be a PAAS environment. This PAAS environment can be directly linked in the SAAS environment using Integrated Pages. If the SAAS application is based on Alta-UI the user will not notice a difference between the SAAS application and the custom application providing some additional service.

To load data from the SAAS application again you can use web services. This could be a BI Report that fetches any data from the SAAS application to expose to the PAAS environment. The BI Report can be invoked as a web service.
For example you could fetch your item information based on scanned barcodes including on hand quantities etc.
Next to this actions in the SAAS environment can be triggered by web services, like creating an inventory transaction or order  through a web service invoked from the PAAS environment.

Next to these integration options, Oracle also offers the Integration Cloud Service. This is a service which allows you to easily integrate SAAS to other SAAS application or On Premise applications through web services and maintain your services in this environment.


So .. still enough options to build customizations and do custom integration in cloud.


zondag 25 september 2016

Autoinvoice Import Fusion R11

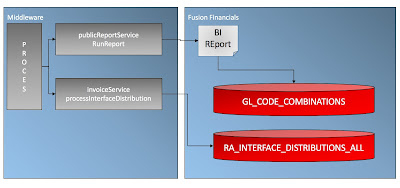
In the past we've been using Autoinvoice import for importing receivables invoices. You fill the RA_INTERFACE_LINES_ALL table and the RA_INTERFACE_DISTRIBUTIONS_ALL as well if you want to create your own distributions and run Autoinvoice Import to validate and import your transactions.

In Fusion we have several options to do the same.


First we have the File Based Loader option. We can use this option manually (for conversion for example) or create a process in your middleware layer to construct the zipped CSV and upload it to UCM for processing.


Information on how to use the file based data import can be found in the Oracle Enterprise Repository (http://docs.oracle.com/cloud/latest/financialscs_gs/OEFBF/AutoInvoice_Import_4016_fbdi_1.htm#4016). You can download the excel template there as well.

In our case we however wanted to use the web services that are available. We have been investigating the services processInterfaceLine and processInterfaceDistribution next to createSimpleInvoice.
The latter can be used to directly create an invoice, but it's, as the service already says, a simple invoice with a header and some lines.

You can also use the createInterfaceLine or processInterfaceLine to create one or multiple lines in the open interface table.

Transaction Flexfield
Important is how to pass the correct context for grouping of the invoices. Usually you create a new transaction descriptive flex field context for each of your imported invoices.
You pass these in the element TransactionInterfaceLineDff.

 <inv:TransactionInterfaceLineDff xsi:type="ns3:CPQCloud" xmlns:ns3="http://xmlns.oracle.com/apps/flex/financials/receivables/transactions/autoInvoices/TransactionLineInterfaceLineDff/">
               <ns3:__FLEX_Context>CPQ Cloud</ns3:__FLEX_Context>
               <!--Optional:-->
               <ns3:_FLEX_NumOfSegments>6</ns3:_FLEX_NumOfSegments>
               <!--Optional:-->
               <ns3:orderNumber>1100</ns3:orderNumber>
               <ns3:orderLineNumber>1</ns3:orderLineNumber>
...
            </inv:TransactionInterfaceLineDff>

In order to use these elements you have to check your setup for the API Names of the context and the segments in your context. Check your setup in Manage Descriptive Flexfields. Search for flex field code RA_INTERFACE_LINES.

Open your context and note the API Name for the context.
Each element also has an API name which you must use in the flex field.


Line flex field
The line descriptive flex field can be passed in the element TransactionLineDff. Here the elements equal the API names again of the flex field attributes. For example an attribute for Service Type could be passed using <tran5:serviceType>...</tran5:serviceType>

Header flex field 
One thing we encountered is that although the createSimpleInvoice service contains a transaction header, and thus the transaction header flex field, but the processInterfaceLine service does not have this element. So currently (R11) it does not seem to be possible to pass the header flex field using this service.

Distributions
Another thing we encountered is that using the processDistributionLine does not contain elements to pass the individual segments for your accounting structure. It only accepts the code combination id. This means we either have to keep a duplicate record of the code combinations to be able to pass the internal id or we fetch the code combination first using a service.


Now there is no standard webservice to fetch the code combination id using the segments and chart of accounts id, so we need to create our own BI report/query to fetch the code combination given the segments and pass that ID to our processInterfaceDistribution service.

A detailed explanation on how to achieve this can be found in this blog http://hakanbiroglu.blogspot.nl/2014/11/leverage-power-of-bi-publisher-in-cloud.html#.V-gR6Ds5ZHQ.

Note that you have to decode the output of the XML from Base64 before you can use the XML that is retrieved.

Submit Autoinvoice Import
Now you can either schedule the Autoinvoice process or submit it from your middle layer. To find the job package name you need to pass navigate to Manage Custom Enterprise Scheduler Jobs for Receivables and Related Applications.


If you open it you will see the name AutoInvoiceMasterEss and the path /oracle/apps/ess/financials/receivables/transactions/autoInvoices/Receivables

When you call the ERP Integration service you pass parameters for example as follows

<?xml version="1.0" encoding="UTF-8" ?>
    <procesparam>
        <username>{Username}</username>
        <pswd>{Password}</pswd>
        <batchid>{batchid}</batchid>
        <businessunit>{BU Id}</businessunit>
    </procesparam>
    
    <jobPackageName>/oracle/apps/ess/financials/receivables/transactions/autoInvoices/Receivables</jobPackageName>
        <jobDefinitionName>AutoInvoiceMasterEss</jobDefinitionName>
        <paramList>1</paramList>
        <paramList>{Your transaction source}</paramList>
        <paramList>19-09-2016</paramList>
    </essparam>


References
Usage notes on the invoice service
http://www.oracle.com/webfolder/technetwork/docs/fbdi-r11/fbdi/supportingdocs/finArTrxnsInvoices-InvoiceService.pdf

woensdag 1 juni 2016

Call Webservice with Proxy from ADF

Following the example from the UI Accelerator app to call a web service in my fusion cloud environment (http://www.oracle.com/technetwork/indexes/samplecode/cloud-samples-2203466.html) I will build the call to the findSelfUserDetails service in ERP Cloud, which I want to use to verify the user.
With many thanks to Hakan Biroglu, for figuring this stuff out in his spare time :-)!

This services does not receive any parameters (like the opportunity examples), so it should be a lot simpler. All we want to do is verify the user information. Like all tutorials it describes the solution bottom up (since you have to develop it bottom up), but it's easier to understand top down. So I'll first try to explain what end result we are trying to achieve and how to get there.

Overview
Eventually we want to create a simply page displaying the user information.


This page actually points to a task flow and the task flow contains a page fragment.

The data control however is based on our web service proxy. To be able to call a web service and show it on the page, we will create a web service with proxy project. This will generate a java class that actually calls the web service (which we will overwrite). But next to that we will need two custom java classes to create a view object based on our web service and a java class that fetches the web service results and puts it in the view object.
The view object in its turn will be exposed as a datacontrol and it's that data control that is displayed on our page fragment.


So these are the components we are going to create.

Step 1: Web service with Proxy project

The first step is to create a new project with web service with proxy client. You can create a new application or a project in an existing application.
In your project choose New, Web Services, Web Service Client and Proxy.


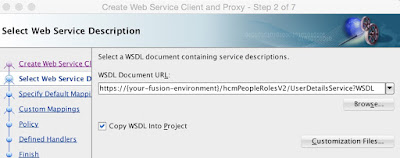
As WSDL you refer to your fusion environment (HCM) and make sure you check Copy WSDL into project so you can review the XSD files in your project as well.


In our case we use our own fusion ERP environment, but this can also be sales cloud. It will be something like oraclecloud.com:nnnn, where nnnn is the port number.
On the next page uncheck Generate as Async.

Move on till you get to this page and check Don't generate any asynchronous methods.

On the policy settings uncheck the Show only the compatible client policies. Make sure the port is set correctly and use wss-username-token-client-policy.
And on the next page with the handlers choose the correct port.


Now you can generate the project. This will create a lot of java classes and the definition files.
To give you an idea open the UserDetails.xsd under apps/hcm/people/roles/userdetailsservicev2.


Here you can see the result is UserDetailsResult with a value containing the fields that it will return.
You can verify the return in SoapUI first of course so you have an idea of the structure. As you can see it contains a Value and UserPersonDetails within the value component.


Step 2: Complete Web Service Proxy Java Class

By creating the web service proxy, the system also generates a java class to call our web service. We are not going to overwrite that, since it gets overwritten when the proxy is regenerated. You will find this file under apps/hcm/people/roles/userdetailsservicev2 in UserDetailsServiceSoapHttpPortClient.java.


So the first thing we will do is create our own PortClient.


Choose New, Java Class.


This will generate the following code.

package wsproxysample.custom;

public class UserDetailsServicePortClientCustom {
    public UserDetailsServicePortClientCustom() {
        super();
    }
}

Now we will change this code as follows.

package wsproxysample.custom;

import com.oracle.xmlns.apps.hcm.people.roles.userdetailsservicev2.UserDetails;
import com.oracle.xmlns.apps.hcm.people.roles.userdetailsservicev2.UserDetailsResult;
import com.oracle.xmlns.apps.hcm.people.roles.userdetailsservicev2.UserDetailsService;
import com.oracle.xmlns.apps.hcm.people.roles.userdetailsservicev2.UserDetailsService_Service;

import com.sun.xml.ws.developer.WSBindingProvider;

import java.util.List;
import java.util.Map;

import javax.xml.ws.BindingProvider;
import javax.xml.ws.WebServiceRef;

import weblogic.wsee.jws.jaxws.owsm.SecurityPolicyFeature;

// Here our class starts

public class UserDetailsServicePortClientCustom {
    
// Copy the web service reference annotation with the associated properties (will import or use Alt-Enter). And create two private variables to hold the web service.

    @WebServiceRef
    private static UserDetailsService_Service userDetailsService_Service;
    private UserDetailsService userDetailsService;
    
    public UserDetailsServicePortClientCustom() {
        super();
    }
    
//Next step is to create a list of the user details. The type UserDetails is what we saw earlier in our XSD.
    @SuppressWarnings("unchecked")
    public List<UserDetails> findUserDetails() throws Exception {
    /* Initialize/authenticate service */

//Initialize the service and set the policy.
    UserDetailsService_Service userDetailsService_Service = new UserDetailsService_Service();
    //we are using basic authorizat ion to call a webservice usin g https protocol, so that we have to use ssl_client_policy OWSMpolicy
    SecurityPolicyFeature[] m_securityFeature =
    new SecurityPolicyFeature[] { new SecurityPolicyFeature("oracle/wss_username_token_over_ssl_client_policy") };
    //initialize binding object by setting up security policy
    userDetailsService = userDetailsService_Service.getUserDetailsServiceSoapHttpPort(m_securityFeature);
    //OpportunityService opportunityService = opportunityService_Service.getOpportunityServiceSoapHttpPort(m_securityFeature);
    //retrieve request context object to setup http header
    WSBindingProvider wsbp = (WSBindingProvider)userDetailsService;
    Map<String, Object> requestContext = wsbp.getRequestContext();

//Here you add the actual service endpoint and the username/password you use to connect.

    String serviceEndpoint = "https://{your fusion cloud environment}/hcmPeopleRolesV2/UserDetailsService";
    String serviceUsername = "{your username}";
    String servicePassword = "{your password}";
    requestContext.put (BindingProvider.ENDPOINT_ADDRESS_PROPERTY,serviceEndpoint );
    requestContext.put (WSBindingProvider.USERNAME_PROPERTY,serviceUsername);    
    requestContext.put (WSBindingProvider.PASSWORD_PROPERTY,servicePassword);
    /* busines logic */

//Again check the XSD to see it returns a userdetailsresult object and a value within that. So we use getValue to get the actual result.

    UserDetailsResult userDetailsResult = userDetailsService.findSelfUserDetails();

        return userDetailsResult.getValue();
    }
}


So what we've build now is a java program that calls the web service and fetches the results and returns that. Next step is we want to call this service from another java class that puts the result in a view object. Both the view object and the java class to call the service and put the result in the view object is what we will create next.

Note that our example is very simple without any parameters. The opportunity service example is much more elaborate.

Step 3: Create View Object Java Class

Next step is to create a java class for a view object. Go to your View Controller project and choose New, Java Class.


We call this class UserDetailsVO, since it's the view object for our user details. Since this is a custom view object we need to create our own setters and getters for each element we want to display. We will refer of course to the elements in the UserDetails object we've seen in the XSD.

package test.proxysample.view;

import java.io.Serializable;

public class UserDetailsVO implements Serializable {
    
    @SuppressWarnings("compatibility:5889044184363220877")
    private static final long serialVersionUID = 1771059748298259803L;
    private String personNumber;
    private String displayName;
    private String firstName;
    private String emailAddress;
    
    public UserDetailsVO() {
        super();
    }
    
    public void setPersonNumber(String personNumber) {
    this.personNumber = personNumber;
    }
    public String getPersonNumber() {
    return personNumber;
    }

    public void setFirstName(String firstName) {
    this.firstName = firstName;
    }
    public String getFirstName() {
    return firstName;
    }

    public void setEmailAddress(String emailAddress) {
    this.lastName = emailAddress;
    }
    public String getEmailAddress() {
    return emailAddress;
    }

    public void setDisplayName(String displayName) {
    this.displayName = displayName;
    }
    public String getDisplayName() {
    return displayName;
    }
    
    
}


So now we can display first name, last name, display name and the person number. If we want to display more values, we need to add them here.
Next step is to call the web service and fill our view object with data.

Step 4: Create Java Class to call Webservice and fill View Object


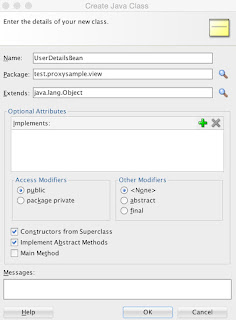
We create another java class in our View Controller project called UserDetailsBean.


The code for this bean is as follows. Note that the structure of our result (Value and PersonDetails) is flattened in our view object.

import com.oracle.xmlns.apps.hcm.people.roles.userdetailsservicev2.UserDetails;
import com.oracle.xmlns.apps.hcm.people.roles.userdetailsservicev2.UserPersonDetails;

import java.util.ArrayList;
import java.util.List;

import test.proxySample.model.custom.UserDetailsServicePortClientCustom;

public class UserDetailsBean {
    
    private UserDetailsServicePortClientCustom proxyClient;
    
    public UserDetailsBean() {
        super();
        this.proxyClient = new UserDetailsServicePortClientCustom();
    }
    
// We create a new list for our UserDetails View Object.

    public List<UserDetailsVO> findUserDetails() throws Exception {

// This list is initialized by calling our finduserDetails web service.
    List<UserDetails> list = proxyClient.findUserDetails();
    List<UserDetailsVO> response = new ArrayList<UserDetailsVO>();

// And now we want to parse the result of our web service back to our view object. The top level of our service was the Value. So we loop through the header UserDetails and fetch all the values from the UserDetails object.

    for (UserDetails udBind : list ) {
    //The following at t ributes are returned in the xml payload
    String personNumber = udBind.getPersonNumber().toString();

// Create a new view object instance.
    UserDetailsVO udVO = new UserDetailsVO();

// And set the person number field.
    udVO.setPersonNumber(personNumber);

// Then we get the Person Details, which is a sub of the person. This contains the first name, last name and display name. Review your Soap UI project if you are not sure of the level.

    List<UserPersonDetails> userPersonDetails = udBind.getUserPersonDetails();

// Loop through the results of the details and put the fields in the VO.

    for (UserPersonDetails upd : userPersonDetails) {

        String displayName = upd.getDisplayName().getValue().toString(); 
        String emailAddress  = upd.getEmailAddress().getValue().toString();
        String firstName = upd.getFirstName().getValue().toString();

        udVO.setDisplayName(displayName);
        udVO.setFirstName(firstName);
        udVO.setEmailAddress(emailAddress);
    }

// Return response
    response.add(udVO);
    }
    return response;
    }
}


Step 5: Expose bean as data control


This is simple, right click on the UserDetailsBean and choose Create Data Control at the bottom.


The bean is now exposed as data control and you can drag it onto a page. So we will now create a simple task flow with a page fragment and drag the data control to the page fragment.

Step 6: Create task flow and page fragment


On your View Controller project choose New, ADF Task Flow.


Choose New on your View Controller, ADF Page Fragment. You can base it on a template or for now we simply create a blank page.


Drag the CallWS.jsff onto your task flow callWS-flow.
You can also add page parameters to the task flow, but we won't do that for now.

Now we drag the data control onto our callWS.jsff page fragment.


Our very simple page now looks like this


Step 7: Create task flow and page fragment

The last step is to create our main page and drag the task flow onto that page. To do this create a new page. Add a PanelGroupLayout with vertical alignment. Drag the task flow in the source editor in the group layout and make sure you move it in the group layout.


Step 8: Import certificates

Before you deploy it, we first have to import the certificates from the service.

Go the website of your fusion application in Internet Explorer or Firefox and click on the lock.  Choose Export to export the certificates.

On the mac find the location of your JDK (keytool). In my case it was located in 
/library/java/JavaVirtualMachines/jdk1.8*/contents/home/bin.

Second, save the certificates in some directory on your computer. Let's say this is /users/../myDir
Check the location of the keystone in your Jdeveloper, Preferences. Let's say this is {KeyStorePath}.


keytool -importcert -file /users/../myDir/eccs-test-root.cer -keystore {KeyStorePath} -alias eccs-test-root -storepass DemoTrustKeyStorePassPhrase
keytool -importcert -file /users/../myDir/eccs-test-intermed.cer -keystore {KeyStorePath} -alias eccs-test-intermed -storepass DemoTrustKeyStorePassPhrase
keytool -importcert -file /users/../myDir/eccs-test-fs.em2.oracle.com.cer -keystore {KeyStorePath} -alias eccs-test-fs.em2.oracle.com -storepass DemoTrustKeyStorePassPhrase


Step 9: Set web logic security

Go the project properties of your view controller project.


Choose Run/Debug and edit the Default configuration.
Copy 
-Dweblogic.security.SSL.ignoreHostnameVerification=true
in the java options of the virtual machine.


Step 10: Run on integrated web logic server

Click on the home page and choose Run.


Other

So if you want to add more fields to display in your web service data control, modify UserDetailsVO.java.
You can also add information from the user session details or user work relationship details for example. For example fetch the language from the user session details. Add this field to your view object.

    
    private String language;

    public void setLanguage(String language) {
    this.language = language;
    }
    public String getLanguage() {
    return language;
    }


Then add it to the UserDetailsBean.java, since we need to fetch it from the web service and put it in the data control.

Add this to the UserDetailsBean.java after the for loop for the person details.

        List<UserSessionDetails> userSessionDetails = udBind.getUserSessionDetails();
        for (UserSessionDetails usd : userSessionDetails) {
            String language = usd.getLanguage().getValue().toString();             
            udVO.setLanguage(language);
        }  


Now go to your page fragment (callWS.jsff) and drag the language on the page. Set the property Behavior Read Only to true.

And when you re-run your page ...


Have fun!

woensdag 27 april 2016

Integrate Procurement Cloud Contracts and eBS Procure to Pay (on premise)


In the previous blog we investigated an integration between Oracle eBS on premise and Oracle Sourcing in the cloud.

http://pamkoertshuis.blogspot.nl/2016/04/procurement-integration-ebusiness-suite.html


The integration scenario is shown above. We performed a direct integration without any middleware starting in eBS on premise with a requisition for a sourcing event. This triggered a web service to create the sourcing event directly in cloud. After rewarding the sourcing event another process is triggered to fetch the awarded event and create the purchase order in eBS (either through the open interface, the API (see for example http://pamkoertshuis.blogspot.nl/2015/11/open-interface-requisition-to-purchase.html)  or a custom exposed web service through Integrated SOA Gateway for example).

Of course the same scenario can be handled using middleware (like Oracle SOA or any other servicebus). The following scenario starts in the cloud environment with a purchasing contract. All contracts are managed centrally in the cloud environment and we want to enforce the contract agreements on our subsystems where procure to pay is handled.
So in generic terms, we are looking for the following integration.


Supplier qualification is in this scenario also done in the cloud, so our cloud environment is the master for our supplier base and the suppliers need to be interfaced to the subsystems (which could be only one, but also multiple).

Our main concern now is how to get the data from our cloud environment to our subsystems. Of course there is always the method of calling web services, but how do we know which contracts and suppliers have been created?
The procurement cloud solution however comes with a very nice solution for this. The cloud solution already contains a standard SOA process that is triggered by the creation/updating of both contracts and suppliers.
For contracts this is called the Purchasing Integration SOA, for suppliers the Supplier Sync Service. Both are BPEL processes that accept events from procurement cloud and which call a set of web services to handle the requests.


The ECM contract fulfillment SOA implementation has attempted to modularize integration with the target procurement application based on the purchasing flow that is derived from the contract type of the given contract:
  • If a contract is created from a contract type with intent as 'Buy' and contract type class as 'Enterprise Contract', then purchase orders can be initiated from the fulfillment lines of the contract.
  • If a contract is created from a contract type with intent as 'Buy', contract type class as 'Agreement', and lines are allowed on the contract type, then blanket purchase agreements can be initiated from the fulfillment lines of the contract.
  • If a contract is created from a contract type with intent as 'Buy', contract type class as 'Agreement', and lines are not allowed on the contract type, then contract purchase agreement can be initiated from the fulfillment line of the contract.

For the internal handling of contracts to purchase orders it calls the same SOA process, but it can also call third party web services (so called intermediary web services). So in a full diagram, this is what we can achieve.
Note that I also described our previous integration scenario in the diagram, where instead of a direct integration from eBS to the cloud we could use an intermediary service in our integration layer.


In the current scenario we do our strategic procurement (contracts management, supplier qualification) in the cloud and we use the Purchasing Integration SOA and Supplier Sync Service to send our data to an integration layer. This integration layer contains the intermediary web services required for the integration, which in their place handle the specific requests necessary for the subsystems. In eBS for example it could fill the open interface tables, call an API or call a custom web service exposed through Integrated SOA Gateway. Of course integration with eBS is something we are already familiair with!

The intermediary web service needs to be of a specific format (the interface/WSDL is fixed, see below), which is described in
Note that in theory we could create this web service also directly in eBS (using Integrated SOA Gateway for example) and do a direct integration.

Now all you have to is register the intermediary web service in Manage Contract and Procurement System Integration.

As you can see here the system supports two methods of integration: Direct and Indirect. With direct integration you call a web service that immediately returns the result and the contract information is updated with the information returned by the service.
Using indirect integration it assumes you use an integration pattern with staging tables (like the open interface of eBS) and you run the ECM Contract Fulfillment Batch program to return the result to the cloud.
You can specify multiple endpoints here, but in our scenario it makes sense to create one intermediary service on the integration layer which handles the transformation to the different subsystems.

For suppliers the setup is more or less similar, except that you can only specify one endpoint (in this case you are likely to use middleware to transfer the supplier data to multiple systems).


So all we need to do in our integration scenario is write the logic for the intermediary service. The triggering of the business events and the invocation of our web services is handled by setup in the cloud!


Interface Intermediary Webservice


<?xml version="1.0" encoding="UTF-8"?>
<wsdl:definitions name="PurchasingInterfaceService" targetNamespace=http://xmlns.oracle.com/apps/contracts/deliverableTracking/purchasingInterfaceService/ xmlns:ns1="http://xmlns.oracle.com/apps/contracts/deliverableTracking/purchasingInterfaceService/contracts PurchaseDocument/types/"
xmlns:plnk="http://schemas.xmlsoap.org/ws/2003/05/partner-link/" xmlns:client=http://xmlns.oracle.com/apps/contracts/deliverableTracking/purchasingInterfaceService/ xmlns:wsdl="http://schemas.xmlsoap.org/wsdl/">
<wsdl:documentation>

<name>PurchasingInterfaceService</name> <docCategories> <category>None</category> </docCategories>
</wsdl:documentation>
<plnk:partnerLinkType name="FusionPurchasingInterfaceProcess"> <plnk:role name="PurchasingInterfaceProcessProvider">

<plnk:portType name="client:PurchasingInterfaceService"/> </plnk:role>
<plnk:role name="PurchasingInterfaceProcessRequester"> <plnk:portType name="client:PurchasingInterfaceServiceResponse"/> </plnk:role>

</plnk:partnerLinkType>
<wsdl:types>
<schema xmlns="http://www.w3.org/2001/XMLSchema">

<import namespace="http://xmlns.oracle.com/apps/contracts/deliverableTracking/purchasingInterfaceService/contract sPurchaseDocument/types/"
schemaLocation="xsd/PurchasingInterfaceService.xsd"/>
</schema>
<schema xmlns="http://www.w3.org/2001/XMLSchema">
<import namespace="http://schemas.xmlsoap.org/ws/2003/03/addressing" schemaLocation="oramds:/apps/org/xmlsoap/schemas/ws/2003/03/addressing/ws-addressing.xsd"/> </schema>
</wsdl:types>
<wsdl:message name="GetPurchaseDocumentRequest">
<wsdl:part name="payload" element="ns1:GetPurchaseDocumentRequest"/>
</wsdl:message>
<wsdl:message name="GetPurchaseDocumentResponse">
<wsdl:part name="payload" element="ns1:GetPurchaseDocumentResponse"/>
</wsdl:message>
<wsdl:message name="CreatePurchaseDocumentRequest">
<wsdl:part name="payload" element="ns1:CreatePurchaseDocumentRequest"/>
</wsdl:message>
<wsdl:message name="GetInterfaceDocDetailsRequest">

<wsdl:part name="payload" element="ns1:GetInterfaceDocDetailsMessage"/> </wsdl:message>
<wsdl:message name="CreatePurchaseDocumentResponse">

<wsdl:part name="payload" element="ns1:CreatePurchaseDocumentResponse"/> </wsdl:message>
<wsdl:message name="GetInterfaceDocDetailsResponse">

<wsdl:part name="payload" element="ns1:GetInterfaceDocDetailsMessage"/> </wsdl:message>
<wsdl:message name="TestRequest">

<wsdl:part name="payload" element="ns1:TestRequest"/> </wsdl:message>
<wsdl:message name="TestResponse">

<wsdl:part name="result" element="ns1:TestResponse"/> </wsdl:message>
<wsdl:portType name="PurchasingInterfaceService">

<wsdl:operation name="getPurchasingActivityDetails">
<wsdl:input message="client:GetPurchaseDocumentRequest"/>

<wsdl:output message="client:GetPurchaseDocumentResponse"/> </wsdl:operation>
<wsdl:operation name="createPurchaseDocument">

<wsdl:input message="client:CreatePurchaseDocumentRequest"/> </wsdl:operation>
<wsdl:operation name="getInterfacedPurchasingDocumentDetails">

<wsdl:input message="client:GetInterfaceDocDetailsRequest"/> </wsdl:operation>
<wsdl:operation name="testIntegration">

<wsdl:input message="client:TestRequest"/>
<wsdl:output message="client:TestResponse"/> </wsdl:operation>
</wsdl:portType>
<wsdl:portType name="PurchasingInterfaceServiceResponse">

<wsdl:operation name="createPurchaseDocumentResponse"> <wsdl:input message="client:CreatePurchaseDocumentResponse"/>
</wsdl:operation>
<wsdl:operation name="getInterfacedPurchasingDocumentDetailsResponse">
<wsdl:input message="client:GetInterfaceDocDetailsResponse"/> page11image1216 page11image1640 page11image1800
</wsdl:operation> </wsdl:portType> </wsdl:definitions>