Posts tonen met het label ERP Cloud. Alle posts tonen

dinsdag 6 december 2016

eBS Customization and Conversion versus Cloud Customization and Conversion

In a traditional Oracle e-Business Suite environment customization logic (forms, triggers, procedures etc) are directly coded in the Oracle e-Business Suite environment. Because of this the logic is directly integrated and all objects are immediately accessible.
Conversion and integration usually takes places via open interfaces (there are more possibilities of course like API's, database links, webservices, integrated SOA Gateway, etc). But usually we use a traditional conversion file, which is first loaded in a custom staging table where we do enrichment, validation and transformation before sending the information to the open interface.


How is this changed in a cloud environment?

In a cloud environment these open interfaces are still there. They are unlocked using UCM, the Universal Content Manager. Using standard import processing, which were available in Oracle eBS as well, the data from UCM is loaded into the open interfaces and imported in the Oracle tables.

The main difference with the traditional eBS environment is that all enrichment and transformation must have taken place before loading into UCM. You deliver the enriched and validated data for example through excel spreadsheets which can be loaded using File Based Data Import.
Excel sheet templates can be loaded from Oracle Enterprise Repository.
(For example templates for ERP Cloud can be found here http://docs.oracle.com/cloud/latest/financialscs_gs/OEFBF/FBDIOverview.htm#FBDIOverview)


Next to File Based Data Import the SAAS environment also provides several webservices which can be invoked directly from the external application. Usually this occurs using a middleware environment (like SOA Suite, Mulesoft etc), where enrichment and transformation takes place (and where also error handling with an error hospital is usually taken into account).
Note that File Based Data Import can also be invoked as a webservice. Using middleware you would do your enrichment and transformation and you send the excel files to UCM, which will load the open interfaces. You could even fetch some data from SAAS first to enrich the data using a webservice that invokes a BI Report to fetch the data.

In stead of developing customizations directly into the SAAS environment, customizations can be developed in a separate environment. This can be a PAAS environment. This PAAS environment can be directly linked in the SAAS environment using Integrated Pages. If the SAAS application is based on Alta-UI the user will not notice a difference between the SAAS application and the custom application providing some additional service.

To load data from the SAAS application again you can use web services. This could be a BI Report that fetches any data from the SAAS application to expose to the PAAS environment. The BI Report can be invoked as a web service.
For example you could fetch your item information based on scanned barcodes including on hand quantities etc.
Next to this actions in the SAAS environment can be triggered by web services, like creating an inventory transaction or order  through a web service invoked from the PAAS environment.

Next to these integration options, Oracle also offers the Integration Cloud Service. This is a service which allows you to easily integrate SAAS to other SAAS application or On Premise applications through web services and maintain your services in this environment.


So .. still enough options to build customizations and do custom integration in cloud.


zondag 25 september 2016

Autoinvoice Import Fusion R11

In the past we've been using Autoinvoice import for importing receivables invoices. You fill the RA_INTERFACE_LINES_ALL table and the RA_INTERFACE_DISTRIBUTIONS_ALL as well if you want to create your own distributions and run Autoinvoice Import to validate and import your transactions.

In Fusion we have several options to do the same.


First we have the File Based Loader option. We can use this option manually (for conversion for example) or create a process in your middleware layer to construct the zipped CSV and upload it to UCM for processing.


Information on how to use the file based data import can be found in the Oracle Enterprise Repository (http://docs.oracle.com/cloud/latest/financialscs_gs/OEFBF/AutoInvoice_Import_4016_fbdi_1.htm#4016). You can download the excel template there as well.

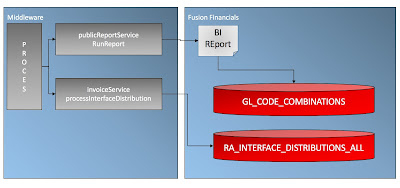
In our case we however wanted to use the web services that are available. We have been investigating the services processInterfaceLine and processInterfaceDistribution next to createSimpleInvoice.
The latter can be used to directly create an invoice, but it's, as the service already says, a simple invoice with a header and some lines.

You can also use the createInterfaceLine or processInterfaceLine to create one or multiple lines in the open interface table.

Transaction Flexfield
Important is how to pass the correct context for grouping of the invoices. Usually you create a new transaction descriptive flex field context for each of your imported invoices.
You pass these in the element TransactionInterfaceLineDff.

 <inv:TransactionInterfaceLineDff xsi:type="ns3:CPQCloud" xmlns:ns3="http://xmlns.oracle.com/apps/flex/financials/receivables/transactions/autoInvoices/TransactionLineInterfaceLineDff/">
               <ns3:__FLEX_Context>CPQ Cloud</ns3:__FLEX_Context>
               <!--Optional:-->
               <ns3:_FLEX_NumOfSegments>6</ns3:_FLEX_NumOfSegments>
               <!--Optional:-->
               <ns3:orderNumber>1100</ns3:orderNumber>
               <ns3:orderLineNumber>1</ns3:orderLineNumber>
...
            </inv:TransactionInterfaceLineDff>

In order to use these elements you have to check your setup for the API Names of the context and the segments in your context. Check your setup in Manage Descriptive Flexfields. Search for flex field code RA_INTERFACE_LINES.

Open your context and note the API Name for the context.
Each element also has an API name which you must use in the flex field.


Line flex field
The line descriptive flex field can be passed in the element TransactionLineDff. Here the elements equal the API names again of the flex field attributes. For example an attribute for Service Type could be passed using <tran5:serviceType>...</tran5:serviceType>

Header flex field 
One thing we encountered is that although the createSimpleInvoice service contains a transaction header, and thus the transaction header flex field, but the processInterfaceLine service does not have this element. So currently (R11) it does not seem to be possible to pass the header flex field using this service.

Distributions
Another thing we encountered is that using the processDistributionLine does not contain elements to pass the individual segments for your accounting structure. It only accepts the code combination id. This means we either have to keep a duplicate record of the code combinations to be able to pass the internal id or we fetch the code combination first using a service.


Now there is no standard webservice to fetch the code combination id using the segments and chart of accounts id, so we need to create our own BI report/query to fetch the code combination given the segments and pass that ID to our processInterfaceDistribution service.

A detailed explanation on how to achieve this can be found in this blog http://hakanbiroglu.blogspot.nl/2014/11/leverage-power-of-bi-publisher-in-cloud.html#.V-gR6Ds5ZHQ.

Note that you have to decode the output of the XML from Base64 before you can use the XML that is retrieved.

Submit Autoinvoice Import
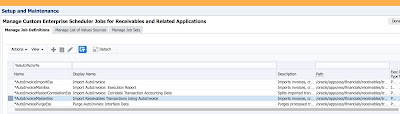
Now you can either schedule the Autoinvoice process or submit it from your middle layer. To find the job package name you need to pass navigate to Manage Custom Enterprise Scheduler Jobs for Receivables and Related Applications.


If you open it you will see the name AutoInvoiceMasterEss and the path /oracle/apps/ess/financials/receivables/transactions/autoInvoices/Receivables

When you call the ERP Integration service you pass parameters for example as follows

<?xml version="1.0" encoding="UTF-8" ?>
    <procesparam>
        <username>{Username}</username>
        <pswd>{Password}</pswd>
        <batchid>{batchid}</batchid>
        <businessunit>{BU Id}</businessunit>
    </procesparam>
    
    <jobPackageName>/oracle/apps/ess/financials/receivables/transactions/autoInvoices/Receivables</jobPackageName>
        <jobDefinitionName>AutoInvoiceMasterEss</jobDefinitionName>
        <paramList>1</paramList>
        <paramList>{Your transaction source}</paramList>
        <paramList>19-09-2016</paramList>
    </essparam>


References
Usage notes on the invoice service
http://www.oracle.com/webfolder/technetwork/docs/fbdi-r11/fbdi/supportingdocs/finArTrxnsInvoices-InvoiceService.pdf

zaterdag 9 april 2016

PAAS4SAAS - Display your custom application in SAAS - part 1: Setting up your integrated page in ERP Cloud


At Profource we have built a Banking Cloud PAAS solution, which we want to expose as an integrated page within ERP Cloud. The PAAS solution has been build using Simplified UI to offer a fully seamless integrated user experience.

In order to achieve this seamless integration, we also need a single sign-on principle as shown below. The user logs in into ERP Cloud and navigates to the integrated page exposed on his springboard. Behind the scenes the system calls the PAAS application using an URL containing a Jason Web Token (JWT), which is validated in the PAAS application and used to do SOAP calls back to the ERP cloud for obtaining data or performing any kind of processing.


But the first step is to define an integrated page that links to your application.

Setting up an integrated page

There are several ways to setup the integrated page, especially in Sales Cloud. In ERP Cloud however, we use the Page Integration Wizard rather than groovy script.
The first step is to register the third party application. 

R10 Setup
Navigate to Setup and Maintenance.


Now choose Manage Third Party Applications and enter your application with the full URL.


R11 Setup
Navigate to Setup and Maintenance > Manage Custom Setup Content (icon on the right) > Topology Definition (heading right) > Manage Third Party Applications (beneath list on the right).

Integrated Page Setup


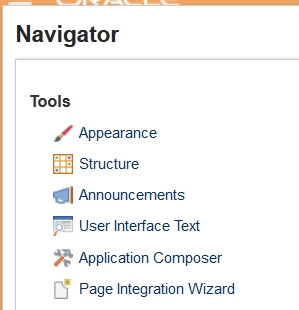
Now navigate to the Tools, Page Integration Wizard and create a new page. If this is your first page you also need to define a category.


Instead of entering a webpage, choose the key and select your web application. Enter the start page you want to land on and add jwt as security token. 

In this example I'm exposing the sample for JWT Token validation as an integrated page. You can download that example from the link below

“Rich UI with Data Visualization Components and JWT UserToken validation extending Oracle Sales Cloud– 1.0.1”


If necessary you can also add parameters to your startpage simply by adding them using ?myParam=[myvalue]

Now you need to do one more thing and that’s expand the window, because on default it shows up only small. Choose Customize Workarea Pages and drag the page in the right corner to its correct size.

So now we are all set on the SAAS side. If we click the icon from the springboard it will open the URL and navigate to the page passing the JWT.

There is one other thing you need to do to make sure your ADF solution can run as an integrated page, since it’s contained in an iFrame. In JDeveloper 12.1.3 you need to set the FRAMEBUSTING in web.xml to never


However, this is not the most secure way. In JDeveloper 12.2 you can use a whitelist. For more information see
“Now you can specify a list of origins that are allowed to frame documents in your application. To do this, use the org.apache.myfaces.trinidad.security.FRAME_BUSTING context parameter set to whitelist and the oracle.adf.view.ALLOWED_ORIGINS context parameter. For more information, see Framebusting.”

 Ok that's all now! You can run your application as an integrated page in Fusion ERP. Your application can run on premise or be deployed on Java Cloud Service of course.