With many thanks to Hakan Biroglu, for figuring this stuff out in his spare time :-)!
This services does not receive any parameters (like the opportunity examples), so it should be a lot simpler. All we want to do is verify the user information. Like all tutorials it describes the solution bottom up (since you have to develop it bottom up), but it's easier to understand top down. So I'll first try to explain what end result we are trying to achieve and how to get there.
Overview
Eventually we want to create a simply page displaying the user information.

This page actually points to a task flow and the task flow contains a page fragment.

The data control however is based on our web service proxy. To be able to call a web service and show it on the page, we will create a web service with proxy project. This will generate a java class that actually calls the web service (which we will overwrite). But next to that we will need two custom java classes to create a view object based on our web service and a java class that fetches the web service results and puts it in the view object.
The view object in its turn will be exposed as a datacontrol and it's that data control that is displayed on our page fragment.

So these are the components we are going to create.
Step 1: Web service with Proxy project
The first step is to create a new project with web service with proxy client. You can create a new application or a project in an existing application.
In your project choose New, Web Services, Web Service Client and Proxy.

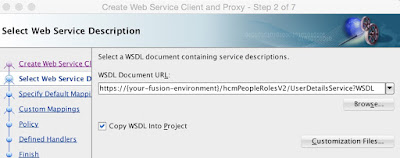
In our case we use our own fusion ERP environment, but this can also be sales cloud. It will be something like oraclecloud.com:nnnn, where nnnn is the port number.
On the next page uncheck Generate as Async.

Move on till you get to this page and check Don't generate any asynchronous methods.

On the policy settings uncheck the Show only the compatible client policies. Make sure the port is set correctly and use wss-username-token-client-policy.
And on the next page with the handlers choose the correct port.


To give you an idea open the UserDetails.xsd under apps/hcm/people/roles/userdetailsservicev2.

Here you can see the result is UserDetailsResult with a value containing the fields that it will return.
You can verify the return in SoapUI first of course so you have an idea of the structure. As you can see it contains a Value and UserPersonDetails within the value component.

Step 2: Complete Web Service Proxy Java Class
By creating the web service proxy, the system also generates a java class to call our web service. We are not going to overwrite that, since it gets overwritten when the proxy is regenerated. You will find this file under apps/hcm/people/roles/userdetailsservicev2 in UserDetailsServiceSoapHttpPortClient.java.

So the first thing we will do is create our own PortClient.

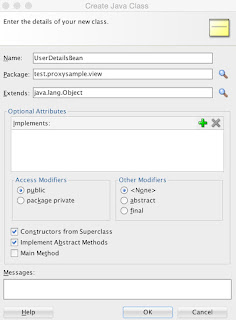
Choose New, Java Class.

package wsproxysample.custom;
public class UserDetailsServicePortClientCustom {
public UserDetailsServicePortClientCustom() {
super();
}
}
Now we will change this code as follows.
package wsproxysample.custom;
import com.oracle.xmlns.apps.hcm.people.roles.userdetailsservicev2.UserDetails;
import com.oracle.xmlns.apps.hcm.people.roles.userdetailsservicev2.UserDetailsResult;
import com.oracle.xmlns.apps.hcm.people.roles.userdetailsservicev2.UserDetailsService;
import com.oracle.xmlns.apps.hcm.people.roles.userdetailsservicev2.UserDetailsService_Service;
import com.sun.xml.ws.developer.WSBindingProvider;
import java.util.List;
import java.util.Map;
import javax.xml.ws.BindingProvider;
import javax.xml.ws.WebServiceRef;
import weblogic.wsee.jws.jaxws.owsm.SecurityPolicyFeature;
// Here our class starts
public class UserDetailsServicePortClientCustom {
// Copy the web service reference annotation with the associated properties (will import or use Alt-Enter). And create two private variables to hold the web service.
@WebServiceRef
private static UserDetailsService_Service userDetailsService_Service;
private UserDetailsService userDetailsService;
public UserDetailsServicePortClientCustom() {
super();
}
//Next step is to create a list of the user details. The type UserDetails is what we saw earlier in our XSD.
@SuppressWarnings("unchecked")
public List<UserDetails> findUserDetails() throws Exception {
/* Initialize/authenticate service */
//Initialize the service and set the policy.
UserDetailsService_Service userDetailsService_Service = new UserDetailsService_Service();
//we are using basic authorizat ion to call a webservice usin g https protocol, so that we have to use ssl_client_policy OWSMpolicy
SecurityPolicyFeature[] m_securityFeature =
new SecurityPolicyFeature[] { new SecurityPolicyFeature("oracle/wss_username_token_over_ssl_client_policy") };
//initialize binding object by setting up security policy
userDetailsService = userDetailsService_Service.getUserDetailsServiceSoapHttpPort(m_securityFeature);
//OpportunityService opportunityService = opportunityService_Service.getOpportunityServiceSoapHttpPort(m_securityFeature);
//retrieve request context object to setup http header
WSBindingProvider wsbp = (WSBindingProvider)userDetailsService;
Map<String, Object> requestContext = wsbp.getRequestContext();
//Here you add the actual service endpoint and the username/password you use to connect.
String serviceEndpoint = "https://{your fusion cloud environment}/hcmPeopleRolesV2/UserDetailsService";
String serviceUsername = "{your username}";
String servicePassword = "{your password}";
requestContext.put (BindingProvider.ENDPOINT_ADDRESS_PROPERTY,serviceEndpoint );
requestContext.put (WSBindingProvider.USERNAME_PROPERTY,serviceUsername);
requestContext.put (WSBindingProvider.PASSWORD_PROPERTY,servicePassword);
/* busines logic */
//Again check the XSD to see it returns a userdetailsresult object and a value within that. So we use getValue to get the actual result.
UserDetailsResult userDetailsResult = userDetailsService.findSelfUserDetails();
return userDetailsResult.getValue();
}
}
So what we've build now is a java program that calls the web service and fetches the results and returns that. Next step is we want to call this service from another java class that puts the result in a view object. Both the view object and the java class to call the service and put the result in the view object is what we will create next.
Note that our example is very simple without any parameters. The opportunity service example is much more elaborate.
Step 3: Create View Object Java Class
Next step is to create a java class for a view object. Go to your View Controller project and choose New, Java Class.


We call this class UserDetailsVO, since it's the view object for our user details. Since this is a custom view object we need to create our own setters and getters for each element we want to display. We will refer of course to the elements in the UserDetails object we've seen in the XSD.
package test.proxysample.view;
import java.io.Serializable;
public class UserDetailsVO implements Serializable {
@SuppressWarnings("compatibility:5889044184363220877")
private static final long serialVersionUID = 1771059748298259803L;
private String personNumber;
private String displayName;
private String firstName;
private String emailAddress;
public UserDetailsVO() {
super();
}
public void setPersonNumber(String personNumber) {
this.personNumber = personNumber;
}
public String getPersonNumber() {
return personNumber;
}
public void setFirstName(String firstName) {
this.firstName = firstName;
}
public String getFirstName() {
return firstName;
}
public void setEmailAddress(String emailAddress) {
this.lastName = emailAddress;
}
public String getEmailAddress() {
return emailAddress;
}
public void setDisplayName(String displayName) {
this.displayName = displayName;
}
public String getDisplayName() {
return displayName;
}
}
So now we can display first name, last name, display name and the person number. If we want to display more values, we need to add them here.
Next step is to call the web service and fill our view object with data.
Step 4: Create Java Class to call Webservice and fill View Object

We create another java class in our View Controller project called UserDetailsBean.
The code for this bean is as follows. Note that the structure of our result (Value and PersonDetails) is flattened in our view object.
import com.oracle.xmlns.apps.hcm.people.roles.userdetailsservicev2.UserDetails;
import com.oracle.xmlns.apps.hcm.people.roles.userdetailsservicev2.UserPersonDetails;
import java.util.ArrayList;
import java.util.List;
import test.proxySample.model.custom.UserDetailsServicePortClientCustom;
public class UserDetailsBean {
private UserDetailsServicePortClientCustom proxyClient;
public UserDetailsBean() {
super();
this.proxyClient = new UserDetailsServicePortClientCustom();
}
// We create a new list for our UserDetails View Object.
public List<UserDetailsVO> findUserDetails() throws Exception {
// This list is initialized by calling our finduserDetails web service.
List<UserDetails> list = proxyClient.findUserDetails();
List<UserDetailsVO> response = new ArrayList<UserDetailsVO>();
// And now we want to parse the result of our web service back to our view object. The top level of our service was the Value. So we loop through the header UserDetails and fetch all the values from the UserDetails object.
for (UserDetails udBind : list ) {
//The following at t ributes are returned in the xml payload
String personNumber = udBind.getPersonNumber().toString();
// Create a new view object instance.
UserDetailsVO udVO = new UserDetailsVO();
// And set the person number field.
udVO.setPersonNumber(personNumber);
// Then we get the Person Details, which is a sub of the person. This contains the first name, last name and display name. Review your Soap UI project if you are not sure of the level.
List<UserPersonDetails> userPersonDetails = udBind.getUserPersonDetails();
// Loop through the results of the details and put the fields in the VO.
for (UserPersonDetails upd : userPersonDetails) {
String displayName = upd.getDisplayName().getValue().toString();
String emailAddress = upd.getEmailAddress().getValue().toString();
String firstName = upd.getFirstName().getValue().toString();
udVO.setDisplayName(displayName);
udVO.setFirstName(firstName);
udVO.setEmailAddress(emailAddress);
}
// Return response
response.add(udVO);
}
return response;
}
}
Step 5: Expose bean as data control

This is simple, right click on the UserDetailsBean and choose Create Data Control at the bottom.

The bean is now exposed as data control and you can drag it onto a page. So we will now create a simple task flow with a page fragment and drag the data control to the page fragment.
Step 6: Create task flow and page fragment

On your View Controller project choose New, ADF Task Flow.

Choose New on your View Controller, ADF Page Fragment. You can base it on a template or for now we simply create a blank page.

Drag the CallWS.jsff onto your task flow callWS-flow.

You can also add page parameters to the task flow, but we won't do that for now.
Now we drag the data control onto our callWS.jsff page fragment.

Our very simple page now looks like this

Step 7: Create task flow and page fragment
The last step is to create our main page and drag the task flow onto that page. To do this create a new page. Add a PanelGroupLayout with vertical alignment. Drag the task flow in the source editor in the group layout and make sure you move it in the group layout.

Step 8: Import certificates
Before you deploy it, we first have to import the certificates from the service.
Go the website of your fusion application in Internet Explorer or Firefox and click on the lock. Choose Export to export the certificates.
On the mac find the location of your JDK (keytool). In my case it was located in
/library/java/JavaVirtualMachines/jdk1.8*/contents/home/bin.
Second, save the certificates in some directory on your computer. Let's say this is /users/../myDir
Check the location of the keystone in your Jdeveloper, Preferences. Let's say this is {KeyStorePath}.

keytool -importcert -file /users/../myDir/eccs-test-root.cer -keystore {KeyStorePath} -alias eccs-test-root -storepass DemoTrustKeyStorePassPhrase
keytool -importcert -file /users/../myDir/eccs-test-intermed.cer -keystore {KeyStorePath} -alias eccs-test-intermed -storepass DemoTrustKeyStorePassPhrase
keytool -importcert -file /users/../myDir/eccs-test-fs.em2.oracle.com.cer -keystore {KeyStorePath} -alias eccs-test-fs.em2.oracle.com -storepass DemoTrustKeyStorePassPhrase
Step 9: Set web logic security
Go the project properties of your view controller project.

Choose Run/Debug and edit the Default configuration.
Copy
-Dweblogic.security.SSL.ignoreHostnameVerification=true
in the java options of the virtual machine.

Step 10: Run on integrated web logic server
Click on the home page and choose Run.
Other
So if you want to add more fields to display in your web service data control, modify UserDetailsVO.java.
You can also add information from the user session details or user work relationship details for example. For example fetch the language from the user session details. Add this field to your view object.
private String language;
public void setLanguage(String language) {
this.language = language;
}
public String getLanguage() {
return language;
}
Then add it to the UserDetailsBean.java, since we need to fetch it from the web service and put it in the data control.
Add this to the UserDetailsBean.java after the for loop for the person details.
List<UserSessionDetails> userSessionDetails = udBind.getUserSessionDetails();
for (UserSessionDetails usd : userSessionDetails) {
String language = usd.getLanguage().getValue().toString();
udVO.setLanguage(language);
}

And when you re-run your page ...

Have fun!