dinsdag 6 december 2016

eBS Customization and Conversion versus Cloud Customization and Conversion

In a traditional Oracle e-Business Suite environment customization logic (forms, triggers, procedures etc) are directly coded in the Oracle e-Business Suite environment. Because of this the logic is directly integrated and all objects are immediately accessible.
Conversion and integration usually takes places via open interfaces (there are more possibilities of course like API's, database links, webservices, integrated SOA Gateway, etc). But usually we use a traditional conversion file, which is first loaded in a custom staging table where we do enrichment, validation and transformation before sending the information to the open interface.


How is this changed in a cloud environment?

In a cloud environment these open interfaces are still there. They are unlocked using UCM, the Universal Content Manager. Using standard import processing, which were available in Oracle eBS as well, the data from UCM is loaded into the open interfaces and imported in the Oracle tables.

The main difference with the traditional eBS environment is that all enrichment and transformation must have taken place before loading into UCM. You deliver the enriched and validated data for example through excel spreadsheets which can be loaded using File Based Data Import.
Excel sheet templates can be loaded from Oracle Enterprise Repository.
(For example templates for ERP Cloud can be found here http://docs.oracle.com/cloud/latest/financialscs_gs/OEFBF/FBDIOverview.htm#FBDIOverview)


Next to File Based Data Import the SAAS environment also provides several webservices which can be invoked directly from the external application. Usually this occurs using a middleware environment (like SOA Suite, Mulesoft etc), where enrichment and transformation takes place (and where also error handling with an error hospital is usually taken into account).
Note that File Based Data Import can also be invoked as a webservice. Using middleware you would do your enrichment and transformation and you send the excel files to UCM, which will load the open interfaces. You could even fetch some data from SAAS first to enrich the data using a webservice that invokes a BI Report to fetch the data.

In stead of developing customizations directly into the SAAS environment, customizations can be developed in a separate environment. This can be a PAAS environment. This PAAS environment can be directly linked in the SAAS environment using Integrated Pages. If the SAAS application is based on Alta-UI the user will not notice a difference between the SAAS application and the custom application providing some additional service.

To load data from the SAAS application again you can use web services. This could be a BI Report that fetches any data from the SAAS application to expose to the PAAS environment. The BI Report can be invoked as a web service.
For example you could fetch your item information based on scanned barcodes including on hand quantities etc.
Next to this actions in the SAAS environment can be triggered by web services, like creating an inventory transaction or order  through a web service invoked from the PAAS environment.

Next to these integration options, Oracle also offers the Integration Cloud Service. This is a service which allows you to easily integrate SAAS to other SAAS application or On Premise applications through web services and maintain your services in this environment.


So .. still enough options to build customizations and do custom integration in cloud.


zaterdag 15 oktober 2016

eBS R12 Upload BLOB/URL as Attachment

I recently had a request on how to upload attachments in eBS from a file. So I dug into my old code and found this logic I once built for storing attachments (URL and files) you upload through an Apex interface as an eBS attachment. We linked it to a party id (stored in field :p300_party_id in Apex) and used a specific category.


Definition of entities
Login as Application Developer and navigate to Attachments. In our case we want to link the attachment directly to the party and we were also using Customers Online. So we used the IMC_ATTACHMENTS entity and the party_id as primary key. We used hard coded category Miscellaneous, but of course you can also choose the category.


Note that we did not have to show the attachments in a form in eBS again (just in Apex), but we wanted it to be available later in Contact Center for example. In that case we should have chosen the entity Parties instead (which also uses the PARTY_ID as unique id).


Create attachment
Now this is the code to create the attachment. For an URL you don't need the actual blob, but for a file you do. We use API's to create the attachment except for the actual BLOB in FND_LOBS. Apparently there is no public API for this (
declare
l_rowid rowid;
l_attached_document_id number;
l_document_id number;
l_media_id number;
l_category_id number := 1; -- MISC
l_pk1_value fnd_attached_documents.pk1_value%TYPE := :p300_party_id; -- Unique id of entity it is attached to
l_description fnd_documents_tl.description%TYPE := :p300_description;
l_filename fnd_documents_tl.file_name%TYPE;
l_seq_num number;
l_mime_type varchar2(240);
l_datatype_id number;

 -- This was specific for blobs we uploaded in APEX. Based on the name of the file
 -- we created an attachment in eBS. Of course you can also fetch your blobs
 -- from somewhere else like a file system or the database.
 cursor c_blob
 is
select blob_content
, filename
, mime_type
from wwv_flow_file_objects$
where name = :p300_file_name
;

l_blob c_blob%rowtype;

BEGIN

  -- In Apex we allowed for adding URLs and actual file upload. So depending
  -- on the entry (URL or not) we created different data types.

IF :p300_url IS NOT NULL
THEN
  l_datatype_id := 5; -- Web page
  l_media_id := null;
ELSE
  l_datatype_id := 6;
  OPEN c_blob;
  FETCH c_blob INTO l_blob;
  CLOSE c_blob;

  l_filename := l_blob.filename;

  select fnd_lobs_s.nextval into l_media_id from dual;

-- Determine mime type
  l_mime_type := l_blob.mime_type;
  
END IF;

If l_datatype_id IN ( 5,6)
THEN

select FND_DOCUMENTS_S.nextval
into   l_document_id
from   dual;

select FND_ATTACHED_DOCUMENTS_S.nextval
into   l_attached_document_id
from   dual;

select nvl(max(seq_num),0) + 10
into   l_seq_num
from   fnd_attached_documents
where  pk1_value = l_pk1_value  -- Your unique ID, we used PARTY_ID
and  entity_name = 'IMC_ATTACHMENTS'; -- This depends on your setup of course

fnd_documents_pkg.insert_row
( X_ROWID                        => l_rowid
, X_DOCUMENT_ID                  => l_document_id
, X_CREATION_DATE                => sysdate
, X_CREATED_BY                   => fnd_global.user_id
, X_LAST_UPDATE_DATE             => sysdate
, X_LAST_UPDATED_BY              => fnd_global.user_id
, X_LAST_UPDATE_LOGIN            => 0
, X_DATATYPE_ID                  => l_datatype_id --5 -- Web Page
, X_CATEGORY_ID                  => l_category_id
, X_SECURITY_TYPE                => 2
, X_PUBLISH_FLAG                 => 'Y'
, X_USAGE_TYPE                   => 'O'
, X_LANGUAGE                     => 'US'
, X_DESCRIPTION                  => l_description 
, X_FILE_NAME                    => l_filename
, X_MEDIA_ID                     => l_media_id
-- R12
, X_URL                          => :p300_URL
);

fnd_documents_pkg.insert_tl_row
( X_DOCUMENT_ID                  => l_document_id
, X_CREATION_DATE                => sysdate
, X_CREATED_BY                   => fnd_global.user_id
, X_LAST_UPDATE_DATE             => sysdate
, X_LAST_UPDATED_BY              => fnd_global.user_id
, X_LAST_UPDATE_LOGIN            => fnd_global.login_id
, X_LANGUAGE                     => 'US'
, X_DESCRIPTION                  => l_description
-- Removed in R12
--, X_FILE_NAME                    => l_filename
--, X_MEDIA_ID                     => l_media_id
, X_TITLE                       => l_filename
);

--dbms_output.put_line (''+Document id :  ''|| l_attached_document_id);

fnd_attached_documents_pkg.insert_row
( X_ROWID    => l_rowid
, X_ATTACHED_DOCUMENT_ID         => l_attached_document_id
, X_DOCUMENT_ID                  => l_document_id
, X_CREATION_DATE                => sysdate
, X_CREATED_BY                   => fnd_global.user_id
, X_LAST_UPDATE_DATE             => sysdate
, X_LAST_UPDATED_BY              => fnd_global.user_id
, X_LAST_UPDATE_LOGIN            => fnd_global.login_id
, X_SEQ_NUM                      => l_seq_num
, X_ENTITY_NAME                  => 'IMC_ATTACHMENTS'
, X_COLUMN1                      => null
, X_PK1_VALUE                    => l_pk1_value
, X_PK2_VALUE                    => null
, X_PK3_VALUE                    => null
, X_PK4_VALUE                    => null
, X_PK5_VALUE                    => null
, X_AUTOMATICALLY_ADDED_FLAG     => 'N'
, X_DATATYPE_ID                  => l_datatype_id
, X_CATEGORY_ID                  => l_category_id
, X_SECURITY_TYPE                => 2
, X_PUBLISH_FLAG                 => 'Y'
, X_LANGUAGE                     => 'US'
, X_DESCRIPTION                  => l_description
, X_FILE_NAME                    => l_filename
, X_MEDIA_ID                     => l_media_id
-- R12
, X_URL                        => :p300_URL
, X_TITLE                        => l_description
);


IF l_media_id IS NOT NULL
THEN
INSERT INTO FND_LOBS
(
  File_Id
, File_Name
, File_Content_Type
, File_Data
, Upload_Date
, Expiration_Date
, Program_Name
, Program_Tag
, Language
, Oracle_Charset
, File_Format
)
VALUES
(
  l_media_id
, l_filename
, l_mime_type
, l_blob.blob_content
, sysdate
, null
, null
, null
, 'US'
, 'UTF8'
, 'binary'
);

END IF; -- URL has no file'

commit;

END IF;

END;


Logic to fetch a file as BLOB from the file system
In our case the files were loaded into Apex wwv_flow_file_objects, but in some cases if you want to apply the logic from a database, you may need to fetch the files from the file system.
Note that in that case usually your code runs on the database server and your files are most likely on the application server.
What we usually do is either use a shared directory or use a host script to copy the file from the application server to $APPLPTMP (which is usually shared) and then call your SQL Package / Script from the host script.

To load the file from an accessible file location use code like this. Note that YOUR_DIRECTORY is a directory in DBA_DIRECTORIES which refers to an actual file location. You create directories using the create directory statement.

DECLARE

  l_bfile   BFILE;
  l_blob    BLOB;
  dir_name  VARCHAR2(240) := 'YOUR_DIRECTORY';
  dir_path  VARCHAR2(240) := '&1';
  file_name VARCHAR2(240) := '&2';

BEGIN

  l_bfile := BFILENAME(dir_name, file_name);

IF (dbms_lob.fileexists(l_bfile) = 1) THEN
      dbms_output.put_line('File Exists');
      
      dbms_output.put_line ('Size: ' || dbms_lob.getlength(l_bfile));
      
      dbms_lob.createtemporary (l_blob,true);
        
      dbms_lob.fileopen( l_bfile, dbms_lob.FILE_READONLY );
      dbms_output.put_line ('File is open for reading ...');
      
      dbms_lob.loadfromfile( l_blob, l_bfile, dbms_lob.getlength(l_bfile),1,1 );
      dbms_output.put_line ('Load from file ...');
       
       
      dbms_lob.fileclose( l_bfile );
      dbms_output.put_line ('Close file ...');

END IF; 

-- So now you have your file in l_blob and you can insert it into a database for example or create your attachment with the logic above.

END;

zondag 25 september 2016

Autoinvoice Import Fusion R11

In the past we've been using Autoinvoice import for importing receivables invoices. You fill the RA_INTERFACE_LINES_ALL table and the RA_INTERFACE_DISTRIBUTIONS_ALL as well if you want to create your own distributions and run Autoinvoice Import to validate and import your transactions.

In Fusion we have several options to do the same.


First we have the File Based Loader option. We can use this option manually (for conversion for example) or create a process in your middleware layer to construct the zipped CSV and upload it to UCM for processing.


Information on how to use the file based data import can be found in the Oracle Enterprise Repository (http://docs.oracle.com/cloud/latest/financialscs_gs/OEFBF/AutoInvoice_Import_4016_fbdi_1.htm#4016). You can download the excel template there as well.

In our case we however wanted to use the web services that are available. We have been investigating the services processInterfaceLine and processInterfaceDistribution next to createSimpleInvoice.
The latter can be used to directly create an invoice, but it's, as the service already says, a simple invoice with a header and some lines.

You can also use the createInterfaceLine or processInterfaceLine to create one or multiple lines in the open interface table.

Transaction Flexfield
Important is how to pass the correct context for grouping of the invoices. Usually you create a new transaction descriptive flex field context for each of your imported invoices.
You pass these in the element TransactionInterfaceLineDff.

 <inv:TransactionInterfaceLineDff xsi:type="ns3:CPQCloud" xmlns:ns3="http://xmlns.oracle.com/apps/flex/financials/receivables/transactions/autoInvoices/TransactionLineInterfaceLineDff/">
               <ns3:__FLEX_Context>CPQ Cloud</ns3:__FLEX_Context>
               <!--Optional:-->
               <ns3:_FLEX_NumOfSegments>6</ns3:_FLEX_NumOfSegments>
               <!--Optional:-->
               <ns3:orderNumber>1100</ns3:orderNumber>
               <ns3:orderLineNumber>1</ns3:orderLineNumber>
...
            </inv:TransactionInterfaceLineDff>

In order to use these elements you have to check your setup for the API Names of the context and the segments in your context. Check your setup in Manage Descriptive Flexfields. Search for flex field code RA_INTERFACE_LINES.

Open your context and note the API Name for the context.
Each element also has an API name which you must use in the flex field.


Line flex field
The line descriptive flex field can be passed in the element TransactionLineDff. Here the elements equal the API names again of the flex field attributes. For example an attribute for Service Type could be passed using <tran5:serviceType>...</tran5:serviceType>

Header flex field 
One thing we encountered is that although the createSimpleInvoice service contains a transaction header, and thus the transaction header flex field, but the processInterfaceLine service does not have this element. So currently (R11) it does not seem to be possible to pass the header flex field using this service.

Distributions
Another thing we encountered is that using the processDistributionLine does not contain elements to pass the individual segments for your accounting structure. It only accepts the code combination id. This means we either have to keep a duplicate record of the code combinations to be able to pass the internal id or we fetch the code combination first using a service.


Now there is no standard webservice to fetch the code combination id using the segments and chart of accounts id, so we need to create our own BI report/query to fetch the code combination given the segments and pass that ID to our processInterfaceDistribution service.

A detailed explanation on how to achieve this can be found in this blog http://hakanbiroglu.blogspot.nl/2014/11/leverage-power-of-bi-publisher-in-cloud.html#.V-gR6Ds5ZHQ.

Note that you have to decode the output of the XML from Base64 before you can use the XML that is retrieved.

Submit Autoinvoice Import
Now you can either schedule the Autoinvoice process or submit it from your middle layer. To find the job package name you need to pass navigate to Manage Custom Enterprise Scheduler Jobs for Receivables and Related Applications.


If you open it you will see the name AutoInvoiceMasterEss and the path /oracle/apps/ess/financials/receivables/transactions/autoInvoices/Receivables

When you call the ERP Integration service you pass parameters for example as follows

<?xml version="1.0" encoding="UTF-8" ?>
    <procesparam>
        <username>{Username}</username>
        <pswd>{Password}</pswd>
        <batchid>{batchid}</batchid>
        <businessunit>{BU Id}</businessunit>
    </procesparam>
    
    <jobPackageName>/oracle/apps/ess/financials/receivables/transactions/autoInvoices/Receivables</jobPackageName>
        <jobDefinitionName>AutoInvoiceMasterEss</jobDefinitionName>
        <paramList>1</paramList>
        <paramList>{Your transaction source}</paramList>
        <paramList>19-09-2016</paramList>
    </essparam>


References
Usage notes on the invoice service
http://www.oracle.com/webfolder/technetwork/docs/fbdi-r11/fbdi/supportingdocs/finArTrxnsInvoices-InvoiceService.pdf

dinsdag 26 juli 2016

Oracle Time and Labor in the Cloud and complex overtime rules

During on of our projects we were implementing Oracle Time and Labor in the cloud using quite complex overtime rules. Depending on your schedule and time entered, the system should calculate different buckets for your overtime ranging from 100% time for time, 120%, 125%, 140%, 150%, 175%, 200% and 220%.
All calculated overtime should be transferred to absence management so you can use it as time for time. We were not using Projects, but Payroll time cards (without actual payroll integration).

In order to set this up in Cloud you need to do the following steps and please note we are using R11!

Step 1: Enable Payroll using Setup and Maintenance, Manage Features by Country or Territory


In our case for The Netherlands we've set it to Payroll. This does not mean you have to pay Payroll license, but you can setup Payroll Time Types.
Only if you enable this you will be able to define payroll time types with Hours x Rate!

Step 2: For each overtime element we want to use navigate to Setup and Maintenance, Manage Elements and create a new element under actions.


Note that the category seems to differ between different releases. In R10 you did not have the Timecard category and you should choose Standard, in R11 you do have two options, but make sure you choose Standard.
Now enter the following information for the element. Make sure the effective date is 1-1-01 for example.


On the next page you choose the calculation method. Only Hours x Rate and Days x Rate appear on the timecard.


Choose next and the element is created.

Step 3: Create element eligibility. On the element created navigate to the Element Eligibility and choose Actions, Create Eligibility.


Step 4: Navigate to the menu menu and choose Payroll, Checklist.
On the right side of the screen choose the icon and Submit a Process or Report.


Choose your legislation and the process Create Time Card Calculation Components.


In the parameters you can choose the elements that are not yet created (so your Overtime X from above). Choose submit.

Step 5: Now the system has created a new element Overtime X CIR. Navigate back to Manage Elements, find the element and set the Element Eligibility like we did for the original element.

Step 6: Navigate to Setup and Maintenance, Define Time and Labor.
Now choose Generate Data Dictionary Time Attributes.


Choose your legislation and make sure you choose Yes for Include Payroll Time Types.

Step 7: Now the new payroll time type will appear in your list on your timecard (if your timecard layout has been setup correctly of course). In our case we wanted the user to enter 'Regular Time' and split the timecard (explosion) to different overtime types, but the user should not be allowed to choose the overtime types manually in the list.
In order to do that you have to define a multiple attribute time card field that we will use on our time card layout.
Navigate to Setup and Maintenance, Define time and labor, manage layout components.
Create a new type. The setup is described here as well
 http://docs.oracle.com/cloud/latest/globalcs_gs/FAITL/FAITL1470626.htm#FAITL934832


So you define a new type and add the payroll time types you ARE allowed to enter. Important are the filters and the settings at the bottom.


Here you specify the default, but also to show the list as a smart choice list. And the filters are setup for the payroll time types based on assignment and start time.


Step 8: So the base is setup now. To understand the setup for OTL take a look at the following diagram.


So there are two parts we need to setup: the layout and the processing. In our example I only added the time calculation rule and no time entry rules (like max your scheduled hours, etc).
Let's first take a look at the layout.

Step 9: Navigate to Setup and Maintenance, Define Time and Labor and choose Manage Time Layout Sets. In our case we create a new layout set based on Payroll.


You have different layouts used for different purposes, but if you change one it usually asks to copy the changes to the other layouts. Make sure if you want that or not.


In our case we want the user to enter time using start and end time, but show calculated hours on the calculated sheet. So the Time Entry Layout is setup as follows


Here we change the default Payroll Time Type to our Restricted time type. We display only start and end time and do not span across midnight.
Note that how the hours are entered is determined by the user's profile setting. We use HH:mi to make sure you can enter 18:00 - 23:00 etc. Otherwise you have to specify AM or PM for example, but this may be valid for other clients of course.

Note that we also did not manage to enter 00:00 (midnight), because it always assumed this was the beginning of the day rather than the end, so we allow users to enter 23:59 and correct this in the time calculation rule to midnight.

The layout for the calculated time shows Payroll Time Types and Hours instead of the restricted list and start/end times. This way it will show our overtime elements in calculated hours.

I will not describe setting up the entry profile here and relating it to your HCM Group, but that is a step you have to do as well of course.
Next is how we setup the time calculation rules.

Step 10: Navigate to Setup and Maintenance, Define time and Labor, Manage Fast Formula.
Our next step is to define the actual formula that is going to do the overtime split.

The first part is mostly copied from the default overtime rule

 /*+======================================================================+
   |                Copyright (c) 2016 Profource                          |
   |                  Rotterdam                                           |
   |                        All rights reserved.                          |
   +======================================================================+
 *
 * Formula Name : XXX_HCM_FF_CALC_OVERTIME 
 *   
 * Formula Type:  Time Calculation Rules
 *  
 * Description:   Calculates overtime split into buckets.
 * 
 * Detail:        Compares the start and end time for the detailed entries  
 *                to the defined time schedule. Splits according to 
 *                rules into different overtime buckets.
 *
 *
 *  Change History
 *  -------------- 
 *
 *  Who               Ver         Date          Description
 *-----------------  ------      ------------  -----------------------------------------
 * Pam Koertshuis     2016.01      2016-JUL-12 Initial creation
 *
 * 
***************************************************************************/  
 default for measure(number)  is  0  
 default for PayrollTimeType(text) is  'NULL' 
 default for StartTime(Date)  is   '01-JAN-1900'(DATE)  
 default for StopTime(Date)   is  '01-JAN-1900'(DATE)   

INPUTS ARE  
  measure(number) ,
  PayrollTimeType(text),
  StartTime(Date),
  StopTime(Date)

paytypeIn = PayrollTimeType
blankDate =  '01-JAN-1900'(DATE) 
ffName = 'XXVTTI_HCM_FF_CALC_OVERTIME  -v2016.01'

NullDate     =  '01-JAN-1900'(DATE) 
NullDateTime = '1900/01/01 00:00:00' (date) 
NullText =  '***NULL***'

ffs_id = GET_CONTEXT(HWM_FFS_ID, 0)
rule_id = GET_CONTEXT(HWM_RULE_ID,  0)  
rec_position = GET_CONTEXT(HWM_RECORD_POSITION, 'DETAIL')


 /* Get context, inorder to makt available for util formula) */
 ctx_personId = GET_CONTEXT(HWM_RESOURCE_ID, 0)
ctx_subResource = GET_CONTEXT(HWM_SUBRESOURCE_ID, 0)
ctx_start_date = GET_CONTEXT(HWM_CTX_SEARCH_START_DATE,  NullDate)
ctx_end_date = GET_CONTEXT(HWM_CTX_SEARCH_END_DATE, NullDate) 

one_minute = 1 / (60 * 24)

/* Since we cannot enter 24:00 we interpret 23:59 as 24:00 */
IF (to_char (ctx_end_date,'HH24:MI') = '23:59')
THEN
(
  rLog  = add_rlog (ffs_id, rule_id,   'Wait a minute ... '  )
  ctx_end_date = add_days (ctx_end_date,one_minute)
  new_measure  = (((days_between(ctx_end_date, ctx_start_date ))*24*60*60)/3600)
)

So this gets the context and adds a minute to midnight. In our case we want to execute for each detail record, because it depends on the payroll time type entered how overtime is calculated. We have Regular Time, Education, specific shift types, etc.

So to check this, we use something like this

IF (rec_position = 'DETAIL' and (PayrollTimeType = 'Regular Time' or PayrollTimeType = 'Education'))
THEN
(

Now our ruling depends on whether it's a public holiday or not. So we add a call to a function to determine if today or tomorrow is a public holiday (in our case a public holiday starts at a certain time the previous day).

  CALL_FORMULA ('XXX_PUBLIC_HOLIDAY' 
  , starttime > 'Start_Time'
  , l_today < 'ToDayHoliday' DEFAULT FALSE
  , l_tomorrow < 'TomorrowHoliday' DEFAULT FALSE 
  )

Now depending on your rules you could add things like

  l_day = to_number (to_char (StartTime,'D'))
  
  G_SUNDAY = 1  
  G_MONDAY = 2
  G_TUESDAY = 3
  G_WEDNESDAY = 4
  G_THURSDAY = 5
  G_FRIDAY = 6
  G_SATURDAY = 7 

  G_TRUE                = 1
  G_FALSE               = 0

IF (l_day = G_SUNDAY OR l_today = G_TRUE)
THEN
(
  x_overtime_100 = new_measure


...

x_total = x_overtime_100 * 2 +
          x_overtime_50 * 1.5 +
          x_overtime_25 * 1.25 
          etc.

So, what this would do is if it today is a sunday or today is a public holiday your time gets rewarded by 100% (so 1 hour results in 2 hours off). At the end you can calculate the total based on your separate components.

Now depending on what you want to see eventually in your exploded time card you add the outputs like

RETURN x_overtime_25, x_overtime_50, x_overtime_100, x_total

Step 11: When you are happy with your formula, we will define the Time Repository Rule template. Here you give the type and the formula you've just created.


Now you can enter the name.


We also want it to fire when you save and on detail level (each entered record).
Now the system will prompt you with the inputs from the formula. The default example of the Shift Premium Calculation uses a time range to determine when overtime is calculated. We did that differently, because we checked his schedule and if your time was written after the schedule you get overtime rewarded.
To fetch the schedule we slightly changed the HCM_WFM_UTIL_GET_EMPLOYMENT_SCHEDULE to fetch both schedule time/start ranges next to the total hours (which it default returns).

The actual percentage depends on when time was entered. For example:
If your schedule is 09:00 - 17:00 and you work
17:00 - 23:00 - you get 100%
23:00 - 07:00 - you get 150%
07:00 - 09:00 - you get 125%
But rules on saturday and sunday and public holidays are different. And this is for regular time and education. There are also other time types you can enter, which get rewarded differently.
And in our case it also depends in which group you fall. So for people from city X the overtime calculations were different.

So .. in our case, the formula did NOT have any input parameters :-).
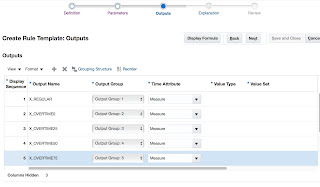
Then for the output parameters add the grouping and the time attribute to Measure.


For each element we also add an OUT_{..} column with time attribute PayRollTimeType.


Now enter the rest of the information like the message. For example

Assigns regular time to {OUT_REGULAR} and splits overtime to {OUT_OVERTIME100} for 100% time for time, {OUT_OVERTIME120} for 120%, {OUT_OVERTIME140} for 140%, {OUT_OVERTIME200} for 200%, {OUT_OVERTIME220} for 220% with the total calculated in {OUT_TOTAL}.

IMPORTANT: You cannot change the template and rules after you've set them up and you cannot save in between :-(.

Step 12: Now we setup the Rule itself. Here we specify the actual values for the parameters we defined on the template.


Again, you cannot make changes later or add outcome, etc.

Step 13: Now we have our rule complete, we only have to add it to a rule set and attach that rule set to our time processing profile.

Navigate to Setup and Maintenance, Define time and Labor, Manage Time Repository Rule sets. Define a new ruleset with date 1-1-50 and add your rule to it. Relate it to the appropriate HCM Group and make sure you set the priority on top (so it overrules the default Payroll catch all groups).

In Manage Worker Time Processing Profile you bring all the things together (also take a look again at the diagram in the beginning). You specify your consumer set, your period and your time calculation rule set and/or time entry rule set (which we did not setup in our case).

Step 14: When the user enters time, the timecard is automatically split.


So some other considerations ..

  • You don't need to add Regular Time as output of your fast formula like we did here (which were hours within schedule). 
  • You can show all the different elements to clarify how the amount was calculated, or only add a Overtime as total of course (calculated by the individual components).
  • Any formulas you create to support your time calculation formula must be Workforce Management Utility type, no legislation and start date 1-1-01.


Step 15: Now to send the time as time for time to absence management we setup an Global Absence Accrual Matrix fast formula as follows.

/*****************************************************************
FORMULA NAME: XXX_NL_ACCRUAL_MATRIX_WITH_OVERTIME
FORMULA TYPE: Global Absence Accrual Matrix
DESCRIPTION:  This formula calculates the accrual rate
Change History:
Name                Date           Comments 
------------------------------------------------------------------
Pam Koertshuis      21-JUL-2016    Added overtime
------------------------------------------------------------------
*****************************************************************/ 

/*=========== DATABASE ITEM DEFAULTS BEGIN =====================*/ 
DEFAULT for PER_ASG_REL_ORIGINAL_DATE_OF_HIRE is '4712/12/31 00:00:00' (date)
DEFAULT for PER_ASG_REL_DATE_START is '4712/12/31 00:00:00' (date) 
DEFAULT for PER_ASG_REL_ACTUAL_TERMINATION_DATE is '4712/12/31 00:00:00' (date) 
DEFAULT for PER_ACCRUAL_BAL_ACCRUAL_RATE is 0
DEFAULT for PER_ASG_FTE_VALUE is 0
DEFAULT for adjustmentvalues is EMPTY_NUMBER_NUMBER
DEFAULT for adjustmentdates is EMPTY_DATE_NUMBER
DEFAULT for adjustmenttypes is EMPTY_TEXT_NUMBER
DEFAULT for IV_EVENT_DATES is EMPTY_DATE_NUMBER
DEFAULT for IV_ACCRUAL_VALUES is EMPTY_NUMBER_NUMBER
DEFAULT FOR PER_ASG_STANDARD_WORKING_HOURS is 0
DEFAULT FOR PER_ASG_COL_AGREEMENT_COLLECTIVE_AGREEMENT_NAME is 'X'
DEFAULT FOR PER_ASG_EMPLOYEE_CATEGORY is 'X'


DEFAULT FOR IV_ACCRUALPERIODENDDATE IS '4712/12/31 00:00:00' (date)


/*=========== DATABASE ITEM DEFAULTS ENDS=======================*/ 
Inputs are IV_EVENT_DATES, IV_ACCRUAL_VALUES
/*, IV_ACCRUALPERIODENDDATE(date) */

v_person_id = get_context(PERSON_ID,0)

Beginning_Of_Calculation_Year = to_date('0101'||to_char(GET_CONTEXT(EFFECTIVE_DATE,'4712/12/31 00:00:00' (date)),'YYYY')
                                         ,'DDMMYYYY')
                                         
                                         
  End_Of_Calculation_Year = to_date('3112'||to_char(GET_CONTEXT(EFFECTIVE_DATE,'4712/12/31 00:00:00' (date)),'YYYY')
                                         ,'DDMMYYYY')                                         
                                         
start_date = Beginning_Of_Calculation_Year
stop_date = End_Of_Calculation_Year

/*IV_ACCRUALPERIODENDDATE*/

accrual = 0
x_tot = 0

x_tot0 = GET_CALCULATED_HOURS(v_person_id, 'Y', start_date, stop_date, 'Overtime 0', 'APPROVED', 0)
x_tot25 = GET_CALCULATED_HOURS(v_person_id, 'Y', start_date, stop_date, 'Overtime 25', 'APPROVED', 0)
x_tot50 = GET_CALCULATED_HOURS(v_person_id, 'Y', start_date, stop_date, 'Overtime 50', 'APPROVED', 0)
x_tot75 = GET_CALCULATED_HOURS(v_person_id, 'Y', start_date, stop_date, 'Overtime 75', 'APPROVED', 0)
x_tot100 = GET_CALCULATED_HOURS(v_person_id, 'Y', start_date, stop_date, 'Overtime 100', 'APPROVED', 0)
x_tot120 = GET_CALCULATED_HOURS(v_person_id, 'Y', start_date, stop_date, 'Overtime 120', 'APPROVED', 0)
x_tot125 = GET_CALCULATED_HOURS(v_person_id, 'Y', start_date, stop_date, 'Overtime 125', 'APPROVED', 0)
x_tot140 = GET_CALCULATED_HOURS(v_person_id, 'Y', start_date, stop_date, 'Overtime 140', 'APPROVED', 0)
x_tot150 = GET_CALCULATED_HOURS(v_person_id, 'Y', start_date, stop_date, 'Overtime 150', 'APPROVED', 0)
x_tot200 = GET_CALCULATED_HOURS(v_person_id, 'Y', start_date, stop_date, 'Overtime 200', 'APPROVED', 0)
x_tot220 = GET_CALCULATED_HOURS(v_person_id, 'Y', start_date, stop_date, 'Overtime 220', 'APPROVED', 0)

x_tot = x_tot0 * 1 +
        x_tot25 * 1.25 +
x_tot50 * 1.5 +
        x_tot75 * 1.75 +
        x_tot100 * 2 +
        x_tot120 * 2.2 +
        x_tot125 * 2.25 +
        x_tot140 * 2.4 + 
        x_tot150 * 2.5 +
        x_tot200 * 3 + 
        x_tot220 * 3.2


ceiling = 0
carryover=9999


accrual = x_tot

/*================ FORMULA SECTION END =========================*/ 

RETURN 
accrual,ceiling,carryover,adjustmentvalues,adjustmentdates,adjustmenttypes

This formula needs to be attached to a vacation plan you relate to the user. Now the total calculated hours are shown on that plan.