The following query may help to find users that haven't logged in for a long time or which responsibilities are actually used in the system. You may filter as well on the count or date to print only users who haven't logged in for a year or not more than 10 times, etc.
The first query shows you per user when he logged in last, how long ago that was, how many times he logged in and whether he's an employee who's not terminated yet ..
I use two views. The second also fetches the last responsibility used. Note that per login you can have multiple records in fnd_login_responsibilities, but you can also have none ..
create or replace view xxx_user_counts_v
as
SELECT U.User_Id
, U.User_Name
, PX.Full_Name
, (SELECT Count (D.Responsibility_Id)
FROM FND_USER_RESP_GROUPS_DIRECT D
WHERE D.User_Id = U.User_id) Nr_of_Responsibilities
, (SELECT PS.Actual_Termination_Date
FROM PER_PERIODS_OF_SERVICE PS
WHERE PS.Person_Id = U.Employee_Id
AND PS.Period_Of_Service_Id =
(
SELECT Max (PS2.Period_Of_Service_Id)
FROM PER_PERIODS_OF_SERVICE PS2
WHERE PS2.Person_Id = U.Employee_Id
)
) Actual_Termination_Date
, To_Char (Max (L.Start_Time),'DD-MM-YYYY HH24:MI:SS') Last_Login_Date
, To_Char (Max (LR.Start_Time),'DD-MM-YYYY HH24:MI:SS') Last_Login_Date_Resp
, Round ((Sysdate-Max (L.Start_Time))) Days_Since_Login
, Count (L.Login_Id) Nr_Of_Logins
, Max (L.Login_Id) Last_Login_Id
FROM FND_USER U
, FND_LOGINS L
, FND_LOGIN_RESPONSIBILITIES LR
--, FND_RESPONSIBILITY_VL R
, PER_PEOPLE_X PX
WHERE U.User_Id = L.User_Id (+)
AND L.Login_Id = LR.Login_Id (+)
--AND LR.Responsibility_Id = R.Responsibility_Id (+)
AND (U.End_Date IS NULL OR U.End_Date > Sysdate)
AND U.EMPLOYEE_ID = PX.Person_Id (+)
GROUP BY U.User_Name
, U.User_Id
, PX.Full_Name
, U.Employee_Id
;
create or replace view xxx_user_counts_v2
as
select c.*
, (select rl.responsibility_name
from FND_RESPONSIBILITY_VL rl
, fnd_login_responsibilities r
where r.login_id = c.last_login_id
and r.responsibility_id = rl.responsibility_id
and r.login_resp_id =
(
select max (r2.login_resp_id)
from fnd_login_responsibilities r2
where r2.login_id = r.login_id
)
) last_resp_used
from xxx_user_counts_v c
;
Now you can do queries like
Number of users who never have logged in, but do have an authorization
select count(*) from xxx_user_counts_v2 where nr_of_logins = 0 and nr_of_responsibilities > 0;
Number of users who haven't logged in for half a year and who have authorizations
select count(*) from xxx_user_counts_v2 where Days_Since_Login > 180 and nr_of_responsibilities > 0;
Users who's employee record have been terminated, but still have access
select count(*) from xxx_user_counts_v2 where actual_termination_date < sydate;
donderdag 25 februari 2016

dinsdag 23 februari 2016
Installation custom application in eBS 12.2.*
Reference: Creating a Custom Application in Oracle E-Business Suite Release 12.2 (Doc ID 1577707.1)
In R12.2 registering a custom application works different than for older releases. In our example we will register a new application called XXX.
In R12.2.x Oracle has introduced online patching, which means there are two file editions, called RUN and PATCH.
We no longer register applications using the Applications form, but will be using adsplice instead.
Step 1: Create the new database schema
CREATE USER XXX
IDENTIFIED BY XXX
DEFAULT TABLESPACE apps_ts_tx_data
TEMPORARY TABLESPACE temp
QUOTA UNLIMITED ON apps_ts_tx_data
QUOTA UNLIMITED ON apps_ts_tx_idx;
GRANT CONNECT, RESOURCE, QUERY REWRITE, CREATE SESSION TO XXX;
Step 2: Download the patch 3636980 (Support Diagnostics (IZU) patch for AD Splice). This patch is generic for R12.
Step 3: Unzip the files in the patch and copy the following three files from p3636980_R12_GENERIC\3636980\izu\admin to your desktop/ current working folder.
izuprod.txt
izuterr.txt
newprods.txt
Step 4:Rename the file izuprod.txt to xxxprod.txt and izuterr.txt to xxxterr.txt So newprods.txt remains intact.
Step 5: Open newprods.txt and replace all references of izu to xxx (or your custom module) and all references of IZU to XXX. Make sure you use correct case.
Step 6: Open xxxprod.txt and do the same by replacing izu by xxx (and IZU by XXX).
Now change the application/product id from 278 to your own unique number (3 occurrences). You can select the highest number used so far using
select max (application_id) from fnd_application;
select max (oracle_id) from fnd_oracle_userid;
and then increase by at least 1, but Oracle recommends to use an id above 50000 .
Make sure you change it also at
"
# install oracle id, default ORACLE username, default ORACLE password
50001 XXX XXX
# application id, abbreviation, shortname, prefix
50001 xxx XXX APP
"
Step 7: Open xxxterr.txt. Change all references of izu to xxx and IZU to XXX.
Change 'Oracle_Support_Diagnostic_Tools' to 'xxx_custom_application".
Step 8: Copy the files to $APPL_TOP/admin directory.
Step 9: Navigate to $APPL_TOP/admin and run adsplice.
Is this the correct APPL_TOP: <enter>
Filename (adsplice.log): adsplice_xxx.log
Is this the correct database: <enter>
Enter the password for your 'SYSTEM' ORACLE schema: <your password>
Enter the ORACLE password of Application Object Library [APPS]: <enter or your password for APPS>
...
Please enter the directory where your AD Splicer control file is located.
The default directory is [.../admin]: <enter>
Please enter the name of your AD Splicer control file [newsprods.txt]: <enter>
...
Do you wish to regenerate your environment file [Yes]: <enter>
..
Check the logfile adsplice_xxx.log for errors.
Step 10: Check the setup
select * from fnd_application where application_short_name = 'XXX';
select * from fnd_product_installations where APPLICATION_ID = 50001;
select * from dba_users where username = 'XXX';
Re-login to Application server and check for environment file
$ env |grep XXX
XXX_TOP=/u01/app/oracle/fs1/EBSapps/appl/xxx/12.0.0
$
$ ls $XXX_TOP
admin log mesg out sql
You now create the other additional directories if needed like bin, /forms/US, include, lib, mds, reports/US, workflow as described in section 4 (create custom objects).
#!/bin/ksh
echo 'Script: $Id: XXX_CUSTOM_DIRECTORY.sh 894 2009-12-04 12:09:55Z apps12 $'
# Create custom application directory structure.
if [ $# -ne 1 ]; then
echo "Please supply a single custom application short name !"
exit 1
fi
echo "Creating custom application structure for custom application: $1"
if [ -z $APPL_TOP/12.0.0/ ]; then
echo "APPL_TOP/12.0.0/ environment variable has not been set !"
exit 1
fi
if [ -z $COMMON_TOP/12.0.0/ ]; then
echo "COMMON_TOP/12.0.0/ environment variable has not been set !"
exit 1
fi
cd $APPL_TOP/${1}_TOP/12.0.0
mkdir -p CEMLIs
mkdir -p bin
mkdir -p data
mkdir -p data/backup
mkdir -p data/in
mkdir -p data/out
mkdir -p forms
mkdir -p forms/US
mkdir -p forms/NL
mkdir -p help
mkdir -p help/US
mkdir -p help/NL
mkdir -p html
mkdir -p install
mkdir -p install/driver
mkdir -p install/import
mkdir -p install/rtf
mkdir -p install/sql
mkdir -p install/workflow
mkdir -p java
mkdir -p log
mkdir -p mds
mkdir -p media
mkdir -p mesg
mkdir -p out
mkdir -p reports
mkdir -p reports/US
mkdir -p reports/NL
mkdir -p resource
mkdir -p sql
mkdir -p xml
mkdir -p files
mkdir -p files/loaded
If you are using a shared APPL_TOP, you run autoconfig on the other nodes and do not rerun adsplice. If it's not shared, you have to repeat the steps for each node.
When you start the next online patching cycle, the prepare phase will run adsplice sync-up actions to synchronize the two file systems.
Check for a known bug 18815526:R12.AD.C in case adsplice sync-up fails when prepare phase is run.
In R12.2 registering a custom application works different than for older releases. In our example we will register a new application called XXX.
In R12.2.x Oracle has introduced online patching, which means there are two file editions, called RUN and PATCH.
We no longer register applications using the Applications form, but will be using adsplice instead.
Step 1: Create the new database schema
CREATE USER XXX
IDENTIFIED BY XXX
DEFAULT TABLESPACE apps_ts_tx_data
TEMPORARY TABLESPACE temp
QUOTA UNLIMITED ON apps_ts_tx_data
QUOTA UNLIMITED ON apps_ts_tx_idx;
GRANT CONNECT, RESOURCE, QUERY REWRITE, CREATE SESSION TO XXX;
Step 2: Download the patch 3636980 (Support Diagnostics (IZU) patch for AD Splice). This patch is generic for R12.
Step 3: Unzip the files in the patch and copy the following three files from p3636980_R12_GENERIC\3636980\izu\admin to your desktop/ current working folder.
izuprod.txt
izuterr.txt
newprods.txt
Step 4:Rename the file izuprod.txt to xxxprod.txt and izuterr.txt to xxxterr.txt So newprods.txt remains intact.
Step 5: Open newprods.txt and replace all references of izu to xxx (or your custom module) and all references of IZU to XXX. Make sure you use correct case.
Step 6: Open xxxprod.txt and do the same by replacing izu by xxx (and IZU by XXX).
Now change the application/product id from 278 to your own unique number (3 occurrences). You can select the highest number used so far using
select max (application_id) from fnd_application;
select max (oracle_id) from fnd_oracle_userid;
and then increase by at least 1, but Oracle recommends to use an id above 50000 .
Make sure you change it also at
"
# install oracle id, default ORACLE username, default ORACLE password
50001 XXX XXX
# application id, abbreviation, shortname, prefix
50001 xxx XXX APP
"
Step 7: Open xxxterr.txt. Change all references of izu to xxx and IZU to XXX.
Change 'Oracle_Support_Diagnostic_Tools' to 'xxx_custom_application".
Step 8: Copy the files to $APPL_TOP/admin directory.
Step 9: Navigate to $APPL_TOP/admin and run adsplice.
Is this the correct APPL_TOP: <enter>
Filename (adsplice.log): adsplice_xxx.log
Is this the correct database: <enter>
Enter the password for your 'SYSTEM' ORACLE schema: <your password>
Enter the ORACLE password of Application Object Library [APPS]: <enter or your password for APPS>
...
Please enter the directory where your AD Splicer control file is located.
The default directory is [.../admin]: <enter>
Please enter the name of your AD Splicer control file [newsprods.txt]: <enter>
...
Do you wish to regenerate your environment file [Yes]: <enter>
..
Check the logfile adsplice_xxx.log for errors.
Step 10: Check the setup
select * from fnd_application where application_short_name = 'XXX';
select * from fnd_product_installations where APPLICATION_ID = 50001;
select * from dba_users where username = 'XXX';
Re-login to Application server and check for environment file
$ env |grep XXX
XXX_TOP=/u01/app/oracle/fs1/EBSapps/appl/xxx/12.0.0
$
$ ls $XXX_TOP
admin log mesg out sql
You now create the other additional directories if needed like bin, /forms/US, include, lib, mds, reports/US, workflow as described in section 4 (create custom objects).
#!/bin/ksh
echo 'Script: $Id: XXX_CUSTOM_DIRECTORY.sh 894 2009-12-04 12:09:55Z apps12 $'
# Create custom application directory structure.
if [ $# -ne 1 ]; then
echo "Please supply a single custom application short name !"
exit 1
fi
echo "Creating custom application structure for custom application: $1"
if [ -z $APPL_TOP/12.0.0/ ]; then
echo "APPL_TOP/12.0.0/ environment variable has not been set !"
exit 1
fi
if [ -z $COMMON_TOP/12.0.0/ ]; then
echo "COMMON_TOP/12.0.0/ environment variable has not been set !"
exit 1
fi
cd $APPL_TOP/${1}_TOP/12.0.0
mkdir -p CEMLIs
mkdir -p bin
mkdir -p data
mkdir -p data/backup
mkdir -p data/in
mkdir -p data/out
mkdir -p forms
mkdir -p forms/US
mkdir -p forms/NL
mkdir -p help
mkdir -p help/US
mkdir -p help/NL
mkdir -p html
mkdir -p install
mkdir -p install/driver
mkdir -p install/import
mkdir -p install/rtf
mkdir -p install/sql
mkdir -p install/workflow
mkdir -p java
mkdir -p log
mkdir -p mds
mkdir -p media
mkdir -p mesg
mkdir -p out
mkdir -p reports
mkdir -p reports/US
mkdir -p reports/NL
mkdir -p resource
mkdir -p sql
mkdir -p xml
mkdir -p files
mkdir -p files/loaded
If you are using a shared APPL_TOP, you run autoconfig on the other nodes and do not rerun adsplice. If it's not shared, you have to repeat the steps for each node.
When you start the next online patching cycle, the prepare phase will run adsplice sync-up actions to synchronize the two file systems.
Check for a known bug 18815526:R12.AD.C in case adsplice sync-up fails when prepare phase is run.
maandag 25 januari 2016
Auto-refresh on table in ADF
For some people this will be a very basic thing to handle, but I had to google from different sources to get this to work, so maybe this be of use to someone else too ..
My requirement is to auto-refresh a table without having to press a button or do refresh. The refresh should not be triggered by another field in the form .. the table is showing status results which are refreshed automatically from the database or other events in our SOA process.
So how does this work?
1. First make sure your table is not set to caching otherwise the data you see in your page is old even if you refresh (Oracle ADF Web Browser Refresh button gets old page/data).

a. To do this go to your table and check the object it is referring to.
b. Now open the Bindings tab of your page and find the correct iterator for this object.
c. In the property inspector of the iterator you set CacheResults to false in the advanced tab.
If you use manually refresh now you get the new data.
2. Second, we are going to add an execute action as a binding to our page. Open the bindings page again and add a binding of type Action.
Navigate to the object in your application module that refers to the table and choose as operation Execute.

3. Go back to your page and in your components palet choose Poll to add a polling element to your page. In the property inspector you can set the interval in milliseconds (so 10000 is 10secs).

4. Go to the property inspector of the poll and choose Edit on the PollListener (open it using the wheel and choose Edit). Create a new managed bean and a method. In my case I want to refresh the status so I choose refreshStatus. Your bean is the package and could be anything like MyBean, etc to group your methods. You don't have to keep them one to one of course.

You have to choose the package where you want to add your bean. You could use
yourcompany.yourapp.view.bean
for example to make sure all your beans are stored in the same place.
5. Modify the code for the bean as follows

And make sure you include the correct libraries
import oracle.adf.model.BindingContext;
import oracle.adf.model.OperationBinding;
import oracle.binding.BindingContainer;
import org.apache.myfaces.trinidad.event.PollEvent;
6. Now in the partial trigger of the poll element we choose Edit and shuttle the table to the right.

That should do the trick! The table refreshes every so many seconds without you having to refresh it yourself.
My requirement is to auto-refresh a table without having to press a button or do refresh. The refresh should not be triggered by another field in the form .. the table is showing status results which are refreshed automatically from the database or other events in our SOA process.
So how does this work?
1. First make sure your table is not set to caching otherwise the data you see in your page is old even if you refresh (Oracle ADF Web Browser Refresh button gets old page/data).
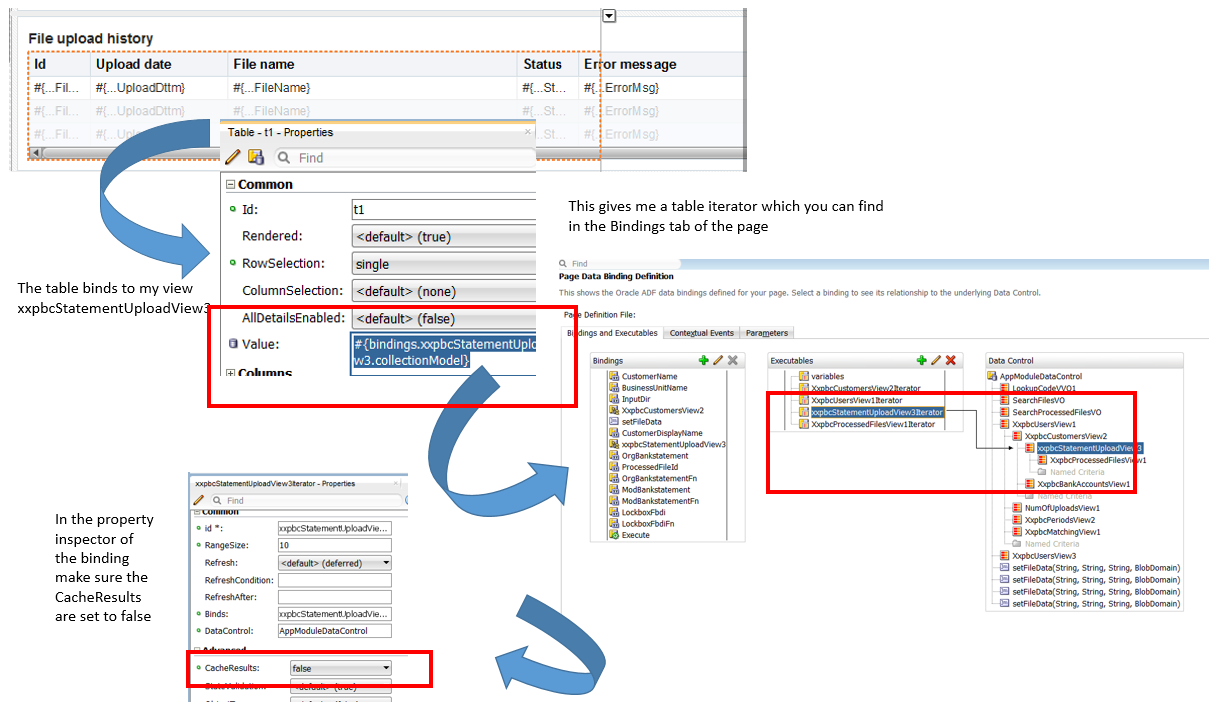


a. To do this go to your table and check the object it is referring to.
b. Now open the Bindings tab of your page and find the correct iterator for this object.
c. In the property inspector of the iterator you set CacheResults to false in the advanced tab.
If you use manually refresh now you get the new data.
2. Second, we are going to add an execute action as a binding to our page. Open the bindings page again and add a binding of type Action.
Navigate to the object in your application module that refers to the table and choose as operation Execute.

3. Go back to your page and in your components palet choose Poll to add a polling element to your page. In the property inspector you can set the interval in milliseconds (so 10000 is 10secs).

4. Go to the property inspector of the poll and choose Edit on the PollListener (open it using the wheel and choose Edit). Create a new managed bean and a method. In my case I want to refresh the status so I choose refreshStatus. Your bean is the package and could be anything like MyBean, etc to group your methods. You don't have to keep them one to one of course.

You have to choose the package where you want to add your bean. You could use
yourcompany.yourapp.view.bean
for example to make sure all your beans are stored in the same place.
5. Modify the code for the bean as follows
public void
refreshStatus (PollEvent pollEvent) {
// Add event code here...
BindingContainer bindings =
(BindingContainer)BindingContext.getCurrent().getCurrentBindingsEntry(); OperationBinding
operationBinding = (OperationBinding)bindings.getOperationBinding("Execute");
Object result =
operationBinding.execute();
}

And make sure you include the correct libraries
import oracle.adf.model.BindingContext;
import oracle.adf.model.OperationBinding;
import oracle.binding.BindingContainer;
import org.apache.myfaces.trinidad.event.PollEvent;
6. Now in the partial trigger of the poll element we choose Edit and shuttle the table to the right.

That should do the trick! The table refreshes every so many seconds without you having to refresh it yourself.
vrijdag 18 december 2015
Schedule calling webservices in your PAAS for SAAS environment
We came across the issue that we need to fetch data from our SAAS environment (could be Sales Cloud, Financials Cloud, etc) on an ongoing basis to make sure the data in our environment is up to date and for speed we want to fetch the data in a batch at night for example.
Now we were used to schedule a concurrent program in eBS if necessary, but now we have this architecture right ...

So for example Java Cloud Service with included Database Cloud Service. We build a custom application in ADF and deploy that to our JCS.
Now we need some information from the SAAS application and of course we can call a webservice to retrieve the data, but in some cases we like to fetch data in bulk in the night for performance and so we can query a group of objects with batch-integrated information.
We cannot schedule something in the SAAS environment to call webservices (and push the data), so we need some scheduling mechanisme in our PAAS environment to retrieve the data.
Oracle Java Cloud Service itself does not support timers or cron, but the Oracle Database Cloud Service supports a package called CLOUD_SCHEDULER which is able to call a PL./SQL stored procedure service.
The Oracle Database Cloud service also supports the ability to call a REST service on Java Cloud Service. This REST service on the Java Cloud Service can call the Oracle SAAS Cloud directly or via a JCS object.

Now we were used to schedule a concurrent program in eBS if necessary, but now we have this architecture right ...

So for example Java Cloud Service with included Database Cloud Service. We build a custom application in ADF and deploy that to our JCS.
Now we need some information from the SAAS application and of course we can call a webservice to retrieve the data, but in some cases we like to fetch data in bulk in the night for performance and so we can query a group of objects with batch-integrated information.
We cannot schedule something in the SAAS environment to call webservices (and push the data), so we need some scheduling mechanisme in our PAAS environment to retrieve the data.
Oracle Java Cloud Service itself does not support timers or cron, but the Oracle Database Cloud Service supports a package called CLOUD_SCHEDULER which is able to call a PL./SQL stored procedure service.
The Oracle Database Cloud service also supports the ability to call a REST service on Java Cloud Service. This REST service on the Java Cloud Service can call the Oracle SAAS Cloud directly or via a JCS object.

woensdag 16 december 2015
Oracle Mobile Cloud Service
Being a
traditional eBS developer who touched mobile applications only slightly I had
some trouble in understanding what Oracle Mobile Cloud Service actually was and
offers.
I
understand DBS (Database Cloud Service), which offers me a platform to run a
database on so I don’t have to get myself a database and a server to run on it.
I understand JCS (Java Cloud Service), which offers me a platform to run Java
based applications, I also understand SAAS applications, so I don’t have to
install and run ERP and Sales like applications on my own servers and maintain
them.
And the nice thing is that in the cloud you have the newest features and monitoring is done in the service centers.
And the nice thing is that in the cloud you have the newest features and monitoring is done in the service centers.
But now for
MCS, Mobile Cloud Service (not that Messaging Cloud Service has the same
acronym somehow).

You don’t
run your mobile application on the mobile cloud service: you run it on a mobile
device right. Like for an ADF application you would still build the app in your
IDE, for example JDeveloper. For your ADF application you could deploy it on
the Java Cloud Service and run the application from there. For your mobile
application, assuming I would build it for example in MAF (JDeveloper with MAF
extension) I would deploy it to the mobile device that needs to run it.


So why do I need a mobile cloud service then? What does it actually offer?
Like I said, your mobile app is not deployed on it, but it sort of runs through it. The main key here tying everything together being the mobile backend. It provides a layer between your mobile app
and the API’s
you are calling and in the same time offers you common services like storage,
(push) notifications, offline options and analytics on your services that are
being called.
It’s also a
kind of hub to register all the API’s you want to call. So rather than having
to build in all kinds of methods to call services from external sources (in all
kinds of different ways probably), you register the APIs in a uniform manor on
the MCS platform and call the APIs through MCS using the URLs exposed by MCS.


So your
mobile app does not directly connect to the services outside anymore, but all
through MCS and MCS provides you an abstraction layer so you can easily
implement your mobile solution without worrying about how to call the services
in the outside world.

And the nice
thing is that the platform also monitors the calls made to the APIs. So you can
see the response time and how often certain APIs are accessed.

Next to this standard monitoring it also provides you a mechanism to monitor events that you can raise through your app. For example how often a service call was delayed and for how much time. By coding these events in your app and flush it to MCS, MCS builds analytics on that.

So pretty
cool right!
So on the
one hand we have the services the MCS offer which we can take a look at and
secondly we like to know what we need to do in our mobile app to make it work
through MCS right? In this blog I will focuss on some of the features and briefly describe how to make a connection to your mobile backend in for example your MAF application to link to your mobile back end of MCS.
Feature Storage
One
of the features, the analytics, I already touched briefly above. A second
feature MCS offers is storage.

MCS offers
you different ways to store data in an easy way to for example share data
temporarily or to persist small data payloads off device (documents, pictures,
preferences, etc). The nice thing about
putting this logic in MCS is that it can be used cross platform.
MCS offers three methods as depicted above
MCS offers three methods as depicted above
1. As externalized REST APIs
2. MCS mobile client SDK
3. Internal to MCS using a custom API
via Node.js
In MCS you
simply define your storage under your Mobile Backend. It can be shared or user
isolated.

Accessing
the storage can be done again using REST calls as shown below.

You can
also use parameters like ?limit=10 or ?offset=20, ?orderBy=contentLength:desc,
etc.
So for
example
{StorageURL}/collections/emp/objects?limit=10
{StorageURL}/collections/emp/objects?limit=10
To query
the first 10 employees of your collection.
Feature Notification API
A
second feature is the push notifications which are supported by MCS. Since each
platform operating system has its own push solution (Android using Google’s
Cloud Messaging service (GCM) and iOS using Apple’s Notification Services (APNS)),
the MCS provides a generic notification service and provides a custom push
server for multiple platforms. The MCS client SDK provides registration with
APNS & GCM and displayes and handles the notifications.
The server side part provides tracking of the registrations, sending the messages, filterable distribution lists, schedule future messages and monitors delivery.
The server side part provides tracking of the registrations, sending the messages, filterable distribution lists, schedule future messages and monitors delivery.
Tying your mobile app to the MCS mobile backend
In order
for your mobile application to flow through MCS you need to tie it together. In
your application XML you add these preferences. The Back End URL, the backend
ID, the application key (same for Android and iOS) and finally the anonymous
key to allow for anonymous access.

<adfmf:preferences>
<adfmf:preferenceGroup
id="mcs" label="Mobile Cloud Service Settings">
<adfmf:preferenceText
id="mobileBackendURL" label="Mobile Backend Base URL"
default="https://ptsdev-usoracle88094.mobileenv.us2.oraclecloud.com:443"/>
<adfmf:preferenceText
id="mobileBackendId" label="Mobile Backend ID"
default="781ec8e7-e306-460b-846c-5c4976a0caea"/>
<adfmf:preferenceText
id="mobileBackendApplicationKeyAndroid"
label="MBE
Application Key (Android)"
default="cd3a8dca-6209-4431-bad4-7061a9f9b25e"/>
<adfmf:preferenceText label="MBE
Application Key (iOS)" id="mobileBackendApplicationKeyiOS"
default="cd3a8dca-6209-4431-bad4-7061a9f9b25e"/>
<adfmf:preferenceText
id="mbeAnonymousKey" label="MBE Anonymous Key"
secret="false" default="VVNPUkFDTEU4ODA5NF9QVFNERVZfTU9CSUxFX0FOT05ZTU9VU19BUFBJRDppaHpybTZrUW9kXzV1bA=="/>
Abonneren op:
Posts (Atom)